Caricare più batterie 18650 potrebbe sembrare complicato all'inizio.
Ma ecco il punto:
Una volta compresi i concetti di base, è in realtà abbastanza semplice. E in questa guida, ti mostrerò esattamente come caricare più batterie 18650 in modo sicuro ed efficiente.
Lavoro con celle agli ioni di litio da anni. E ho testato praticamente ogni metodo di ricarica disponibile.
Quindi in questo post, come professionista produttore di pacchi batteria 18650, spiegherò:
- I modi più sicuri per caricare più 18650
- Attrezzatura di cui avrai bisogno (con raccomandazioni specifiche)
- Procedure di ricarica passo dopo passo
- Errori comuni da evitare
- Tecniche avanzate per utenti esperti
Andiamo subito al sodo.

Perché una corretta ricarica è importante
Ecco qualcosa che la maggior parte delle persone non realizza:
Il modo in cui ricarichi le batterie 18650 influisce direttamente sulla loro durata e sulle prestazioni.
Infatti, una ricarica impropria è la principale causa di guasto prematuro delle celle agli ioni di litio.
Pensaci:
Una batteria 18650 di qualità può gestire tra 500 e 1000 cicli di carica se trattata correttamente. Ma se le carichi male? Potresti arrivare a 50 cicli. Forse meno.
Inoltre, c’è il fattore sicurezza.
Le batterie agli ioni di litio immagazzinano UNA TONNELLATA di energia. E quando quell’energia si rilascia in modo incontrollato (nota come thermal runaway), le cose diventano pericolose in fretta.
La buona notizia?
Con l’approccio giusto, caricare più celle è sia sicuro CHE efficiente.
Attrezzatura Essenziale di cui Avrai Bisogno
Prima di entrare nel processo di ricarica effettivo, parliamo dell’attrezzatura.
Perché ecco il punto:
Avere gli strumenti giusti fa TUTTA la differenza.
Caricatori intelligenti multi-bay
La tua scelta migliore per caricare più 18650?
Un caricatore intelligente multi-bay dedicato.
Questi caricatori gestiscono ogni batteria in modo indipendente. Il che significa che puoi caricare celle con capacità e livelli di carica diversi contemporaneamente.
Le mie scelte migliori:
- Nitecore D4: Gestisce 4 batterie, mostra lo stato di carica individuale
- XTAR VC4: Opzione economica con alimentazione USB
- Opus BT-C3100: Funzionalità avanzate tra cui test di capacità
La caratteristica chiave da cercare?
Canali di ricarica indipendenti.
Questo significa che ogni slot monitora e ricarica la propria batteria separatamente. Nessun rischio di sovraccarico di celle più deboli.
Sistemi di Gestione delle Batterie (BMS)
Hai intenzione di caricare batterie in configurazione serie?
Avrai bisogno di un BMS.
Pensa a un BMS come al cervello del tuo pacco batteria. Monitora la tensione di ogni cella e le equilibra durante la ricarica.
Senza uno?
Stai chiedendo guai.
Attrezzature di Sicurezza
Non saltare questa parte:
- Borsa o contenitore ignifugo per la ricarica
- Multimetro digitale per controlli di tensione
- Custodie di qualità per batterie per lo stoccaggio
- Estintore (Classe D, adatto per incendi di metallo)
Fidati di me su questo:
Questi elementi di sicurezza non sono opzionali. Sono un’assicurazione.
Come caricare più batterie 18650: metodi di ricarica passo passo
Ora passiamo al succo e alle patate.
Analizziamo il processo di ricarica effettivo per diverse configurazioni.
Metodo 1: Ricarica individuale (Opzione più sicura)
Questo è il mio metodo preferito per la maggior parte delle situazioni.
Passo 1: Controlla la tensione della batteria
Usa il tuo multimetro per misurare la tensione di ogni cella. Qualsiasi cosa sotto i 2,5V? Quella batteria potrebbe essere danneggiata.
Passo 2: Inserisci le batterie correttamente
Posiziona ogni 18650 nel caricatore con la polarità corretta. L'estremità negativa piatta va verso la molla.
Passo 3: Seleziona la corrente di ricarica
Inizia con 0,5C (metà della capacità della batteria). Per una cella da 2500mAh, sono 1,25A.
Corrente più bassa = vita più lunga. Corrente più alta = ricarica più veloce.
Passo 4: Monitora i progressi
I caricabatterie di qualità mostrano lo stato di ogni cella. Attenzione a eventuali celle che si caricano significativamente più lentamente delle altre.
Passo 5: Rimuovi quando è completato
La maggior parte dei caricabatterie si ferma automaticamente a 4,2V. Rimuovi le batterie prontamente per evitare la carica di mantenimento.
Metodo 2: Ricarica in parallelo
Vuoi caricare più batterie come un'unica unità?
La ricarica in parallelo potrebbe funzionare per te.
Ma prima, un avvertimento:
Usa solo celle abbinate. Stessa marca, capacità e età.
Ecco come:
Fase 1: Equilibrare prima le tensioni
Tutte le celle devono essere entro 0,05V l'una dall'altra. Usa un supporto in parallelo per lasciarle auto-equilibrare per 30 minuti.
Fase 2: Collegare in parallelo
Collega tutti i terminali positivi insieme. Lo stesso con i negativi.
Fase 3: Caricare come una singola batteria
Il pacco ora si comporta come una cella di grande capacità. Carica alla capacità combinata.
Ad esempio: Tre celle da 2500mAh = capacità totale di 7500mAh.
Metodo 3: Carica in serie (Avanzato)
La carica in serie è più complicata.
Hai a che fare con tensioni più alte e problemi di bilanciamento delle celle.
Il mio consiglio?
Tentalo solo con un BMS adeguato.
Il processo:
Fase 1: Collegare le celle in serie
Collega positivo a negativo, creando una catena.
Fase 2: Collegare il BMS
Collega secondo il diagramma del tuo BMS. Ogni cella ha il suo filo di bilanciamento.
Fase 3: Usare un caricabatterie appropriato
Avrai bisogno di un caricabatterie compatibile con la tensione del tuo pacco. Tre celle in serie = caricabatterie da 12,6V.
Fase 4: Lascia che il BMS gestisca l'equilibratura
Il BMS assicura che nessuna cella superi i 4,2V durante la carica.
Errori comuni da evitare
Vedo questi errori TUTTO il tempo:
Mescolare tipi di batterie
Non mescolare mai capacità o marche diverse nello stesso sistema di ricarica.
Perché?
Si caricheranno a velocità diverse. La cella più debole viene sovraccaricata. Cattiva notizia.
Ignorare la temperatura
Le 18650 si scaldano durante la ricarica. È normale.
Ma se sono caldi al tatto? Interrompi immediatamente.
Temperatura di carica ottimale: 10-45°C.
Usare caricabatterie sbagliati
Quel vecchio caricabatterie NiMH nella tua cassetta?
Non pensarci nemmeno.
Le celle al litio-ion richiedono protocolli di ricarica specifici. Usa solo caricabatterie dedicati alle Li-ion.
Sovraccarico
Lasciare le batterie in carica "solo per sicurezza"?
Smettila.
I caricabatterie moderni evitano il sovraccarico, ma la carica di mantenimento prolungata riduce comunque la vita della batteria.
Consigli avanzati per utenti esperti
Pronto a migliorare il tuo modo di caricare?
Ecco alcune strategie da professionista:
Test di Lotto
Hai una pila di 18650 recuperate?
Testale in batch:
- Carica tutte le celle a 4,2V
- Lascia riposare 24 ore
- Misura di nuovo le tensioni
- Raggruppa per tensioni simili
Celle che mantengono 4,15V+ dopo il riposo? Quelle sono le tue buone.
Carica di conservazione
Non usi le batterie immediatamente?
Carica a 3,7V per conservazione.
Questa "tensione di stoccaggio" massimizza la durata durante lunghi periodi di inattività.
Ricarica rapida in modo sicuro
Hai bisogno di batterie cariche il prima possibile?
Puoi spingere fino a 2C (il doppio della capacità nominale) con celle di qualità.
Ma ecco il problema:
Fallo solo occasionalmente. E monitora attentamente la temperatura.
La ricarica rapida regolare riduce significativamente la durata della batteria.
Soluzioni di ricarica fai-da-te
Vuoi costruire il tuo sistema di ricarica?
È fattibile con i componenti giusti.
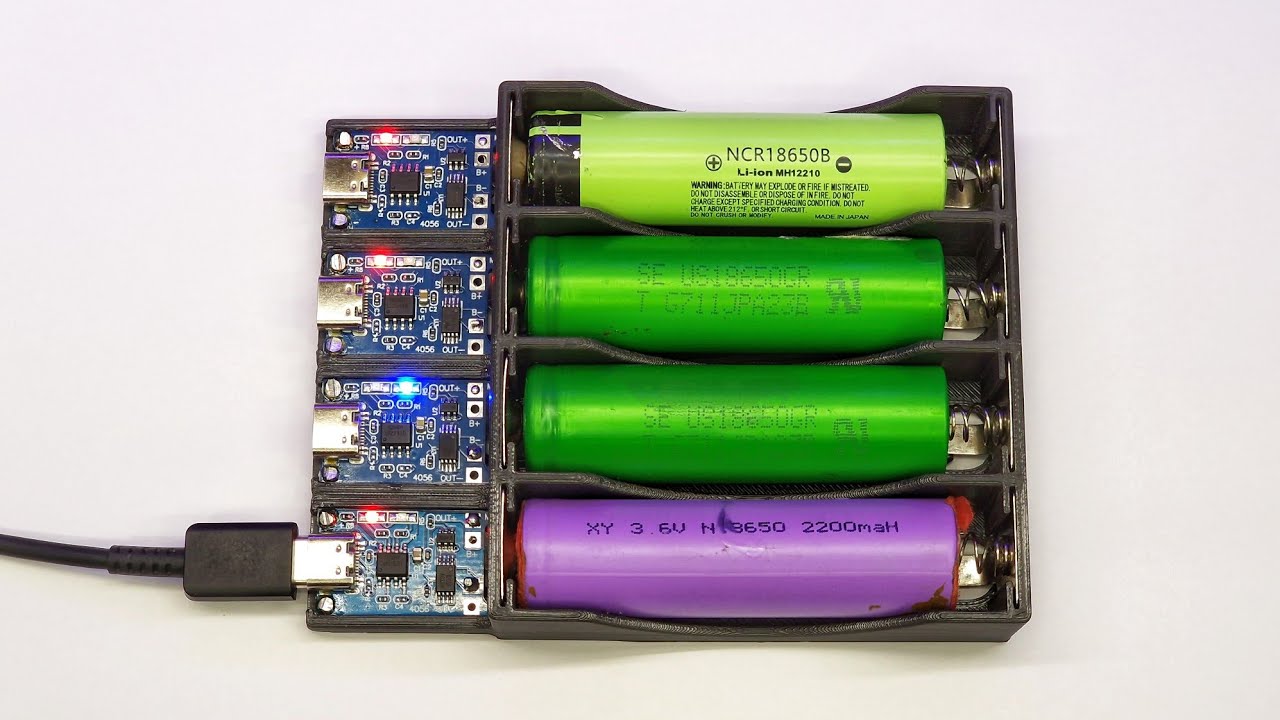
Griglia del modulo TP4056
Questi moduli economici offrono una carica di base per singola cella.
Collega più moduli in parallelo per la carica multi-cellula.
Vantaggi:
- A buon mercato ($1 ciascuno)
- Facile da implementare
- Protezione integrata
Svantaggi:
- Corrente di carica fissa di 1A
- Nessun display o monitoraggio
Caricatore basato su Arduino
Per gli appassionati di tecnologia:
Costruisci un caricatore intelligente con Arduino, sensori di corrente e MOSFET.
Programma curve di carica personalizzate. Aggiungi display LCD. Divertiti.
Ricorda solo:
Con grande potere viene grande responsabilità. Controlla tre volte il tuo codice.
Sicurezza Prima, Sempre
Non posso sottolinearlo abbastanza:
Rispetta queste batterie.
Ho visto il runaway termico di prima mano. Non è bello.
Sempre:
- Carica in aree ignifughe
- Non lasciare mai la ricarica incustodita durante la notte
- Ispeziona le batterie prima di ogni uso
- Smaltire correttamente le celle danneggiate
Risoluzione dei problemi comuni
Hai problemi?
Ecco la tua guida rapida di riparazione:
Le Batterie Non Si Caricano
Controlla prima la tensione. Sotto 2,5V? Prova la "modalità di recupero" sui caricabatterie avanzati.
Ancora niente? La batteria è probabilmente morta.
Caricamento disomogeneo in parallelo
Leggere differenze sono normali. Ma grandi discrepanze indicano celle non abbinate.
Soluzione: Usa batterie con resistenza interna simile.
Il caricabatterie mostra errore
Di solito significa:
- Polaritá sbagliata (controlla + e -)
- Batteria danneggiata
- Malfunzionamento del caricabatterie
Prova slot e batterie diversi per isolare il problema.
Il bilancio
Caricare più batterie 18650 non deve essere complicato.
Inizia con un caricabatterie multi-bay di qualità. Segui le regole di sicurezza di base. Abbina correttamente le tue celle.
Questa è 90% di successo.
Man mano che acquisisci esperienza, puoi esplorare configurazioni in parallelo e in serie. Forse anche costruire soluzioni personalizzate.
Ma ricorda:
La sicurezza viene sempre prima con le celle agli ioni di litio.
Ecco tutto ciò che devi sapere su come caricare più batterie 18650 in modo sicuro ed efficace nel 2025.
Che tu stia alimentando torce, costruendo pacchi batteria o lavorando su progetti fai-da-te, questi metodi ti saranno utili.
Ricorda sempre di dare priorità alla sicurezza, usare attrezzature di qualità e seguire le procedure corrette per come caricare più batterie 18650.


