Comprendere le Connessioni in Serie vs. Parallelo
Quando si costruisce un configurazione di banco batterie al litio, hai due opzioni principali: in serie o in parallelo. Spesso vedo confusione tra le due, ma la differenza è semplice. Pensalo come una scelta tra pressione di potenza (voltaggio) e durata dell'energia immagazzinata (capacità).
Voltaggio vs. Capacità: le Differenze Chiave
- Connessione Parallela LiFePO4: Questo metodo collega i terminali positivi insieme e i terminali negativi insieme. Aumenta la capacità totale (Ampere-ora/Ah) mentre il voltaggio rimane lo stesso. Ad esempio, due batterie da 12V 100Ah in parallelo creano un banco da 12V 200Ah.
- Connessione in Serie LiFePO4: Questo metodo collega il terminale positivo di una batteria a quello negativo della successiva. Aumenta il voltaggio totale mentre la capacità rimane invariata. Due batterie da 12V 100Ah in serie creano un banco da 24V 100Ah.
Tabella di confronto tra Pro e Contro
| Caratteristica | Configurazione in Parallelo | Configurazione in Serie |
|---|---|---|
| Obiettivo Primario | Durata più lunga (Capacità) | Potenza di sistema superiore (Tensione) |
| Complessità dei cablaggi | Basso | Moderato (Richiede bilanciamento) |
| Efficienza del sistema | Standard | Alto (Corrente inferiore, meno calore) |
| Requisiti dei cavi | Cavi più spessi necessari per alte amperaggi | Cavi più sottili a causa di tensione più alta |
| Rischio di guasto | Una batteria può fallire; le altre continuano a funzionare | Il guasto di una batteria interrompe il circuito |
Migliori applicazioni per RV, nautica e energia solare
Scegliere la configurazione giusta dipende completamente dall'attrezzatura e dalle esigenze energetiche. Consiglio di adattare la configurazione al caso d'uso specifico per evitare aggiornamenti inutili delle apparecchiature.
- Espansione della batteria al litio per RV: La maggior parte dei RV funziona con un sistema a 12V DC. Il cablaggio in parallelo è lo standard qui, permettendoti di aumentare il tempo
- Applicazioni nautiche: Per motori trolling, un Configurazione litio da 12V a 48V la connessione in serie è comune per soddisfare le specifiche del motore. Per le banche domestiche, il parallelo è spesso preferito per mantenere la compatibilità a 12V.
- Batteria solare off-grid: In grandi array solari, le connessioni in serie sono fondamentali. Passare a 24V o 48V riduce la dimensione dei cavi necessari e aumenta significativamente l'efficienza dell'inverter e del controller di carica.
Regole Essenziali Prima di Qualsiasi Connessione LiFePO4
Prima di iniziare a fissare i cavi ai terminali, devi seguire regole di preparazione rigorose per proteggere il tuo investimento. Una pianificazione scorretta configurazione di banco batterie al litio porta a guasti prematuri delle celle e può anche innescare un spegnimento del sistema di gestione della batteria (BMS) Quando si costruisce un sistema personalizzato, capire il configurazione di banco batterie al litio è il primo passo verso un sistema di alimentazione sicuro ed efficiente.
Corrispondenza della Tensione e la Procedura di Bilanciamento Superiore
Il passo più critico prima di qualsiasi connessione in serie LiFePO4 or cablaggio parallelo LiFePO4 è la corrispondenza della tensione di ogni unità. Se colleghi batterie con livelli di carica diversi, la batteria ad alta tensione scaricherà enormi quantità di corrente nella batteria a bassa tensione istantaneamente.
- Passo 1: Carica ogni batteria singolarmente fino al 100% utilizzando un caricabatterie dedicato LiFePO4.
- Passo 2: Lascia che si riposino per 24 ore per stabilizzarsi.
- Passo 3: Usa un multimetro per assicurarti che tutte le batterie siano entro 0,05V l'una dall'altra.
- Bilanciamento Superiore: Per i migliori risultati, collega tutte le batterie in parallelo e lasciale stare per 24 ore prima di riconfigurarle nel tuo banco finale in serie o parallelo. Questo garantisce abbinamento dello stato di carica in tutto il sistema.
Utilizzo di Batterie Identiche: Perché Marca e Età Sono Importanti
Non puoi mescolare e abbinare batterie come faresti con vecchie alcaline AA. Per una stabilità Configurazione litio da 12V a 48V, le tue batterie devono essere identiche nelle seguenti aree:
- Capacità (Ah): Mescolare una batteria da 100Ah con una da 200Ah farà sì che la batteria più piccola si scarichi e si ricarichi più velocemente, portando a continue interruzioni del BMS.
- Marca e Modello: Diversi produttori utilizzano logiche di BMS e gradi di celle differenti. Anche una piccola differenza nella resistenza interna può sbilanciare il banco.
- Età e Numero di Cicli: Una batteria di tre anni ha una resistenza interna più alta rispetto a una nuova. Acquista sempre le tue batterie contemporaneamente per garantire che si 'invecchino' insieme. Anche apparecchiature specializzate, come un pacchetto di batterie al litio per computer rugged militari, si affidano a celle perfettamente abbinate per mantenere le prestazioni di picco sotto stress.
Limiti sulla Mescolanza di Chimiche e Stati di Carica
Mai mescolare LiFePO4 con batterie al Piombo, AGM o Lithium-ion standard (NMC) nello stesso banco. Queste chimiche hanno tensioni nominali e profili di ricarica diversi; mescolarli rappresenta un rischio di incendio.
Inoltre, assicurati che il tuo abbinamento dello stato di carica sia verificato prima del primo utilizzo. Se una batteria è a 50% e l'altra a 100%, il BMS farà fatica a bilanciare le celle, riducendo significativamente la capacità utilizzabile di tutto il banco di batterie solari off-grid. Mantieni le cose semplici: stessa marca, stessa capacità, stessa età e stessa tensione.
Connessione in parallelo di Batterie LiFePO4 per Capacità Massima
La connessione in parallelo è il metodo preferito per aumentare la capacità totale in Ampora (Ah) mantenendo la stessa tensione del sistema. Questo è lo standard configurazione di banco batterie al litio per sistemi RV a 12V o configurazioni marine in cui è necessario un tempo di funzionamento significativamente più lungo senza aggiornare l'inverter o i componenti DC esistenti.
Istruzioni passo-passo per il cablaggio in parallelo
- Correlazione dello stato di carica: Prima di effettuare qualsiasi connessione, utilizzare un voltmetro per assicurarsi che ogni batteria sia entro 0,1V dalle altre. Questo evita che una batteria ad alta tensione scarichi una corrente enorme e incontrollata in quella a tensione più bassa.
- Collegare i positivi: Utilizzare cavi di alta qualità e di calibro pesante per collegare il terminale positivo della prima batteria a quello della seconda.
- Collegare i negativi: Collegare il terminale negativo della prima batteria a quello della seconda.
- Uniformità dei cavi: Utilizzare cavi per batterie di lunghezza uguale per ogni ponte. Anche una piccola differenza di lunghezza modifica la resistenza, causando a una batteria di lavorare più duramente delle altre.
Connessione diagonale incrociata e busbar
Per garantire un'usura uniforme dell'intera batteria, utilizzo sempre il metodo di connessione diagonale incrociata . Invece di collegare entrambi i fili principali positivo e negativo alla prima batteria, si collega il positivo principale alla batteria #1 e il negativo principale all'ultima batteria della stringa. Questo costringe la corrente a fluire in modo uniforme attraverso tutte le batterie della banca.
Per configurazioni più grandi con quattro o più batterie, evita i cavi a catena e utilizza busbar di rame solido. I busbar forniscono un punto di terminazione centrale che semplifica cablaggio parallelo LiFePO4 e riduce significativamente il rischio di accumulo di calore dovuto a connessioni terminali allentate o disordinate.
Come caricare in modo sicuro una banca in parallelo
Quando si carica una banca in parallelo, la tensione rimane la stessa, ma il tempo di ricarica necessario aumenta a causa della capacità aggiunta. È possibile utilizzare un caricabatterie compatibile con LiFePO4, ma assicurarsi che la sua corrente sia sufficiente per la dimensione totale della banca. Se si gestiscono anche celle portatili più piccole nel proprio equipaggiamento, seguire una procedura professionale Guida alla ricarica della batteria 21700 può aiutarti a capire come diverse capacità di litio gestiscono la saturazione della corrente.
- Coordinamento BMS: Ogni BMS della batteria continuerà a monitorare le proprie celle, ma il caricatore vede il banco come una grande batteria.
- Monitoraggio amperometro: Usa un monitor di batteria di alta qualità con uno shunt per tracciare la corrente totale in entrata e in uscita dal banco.
- Controlli della temperatura: Durante i primi cicli di carica, verifica la presenza di punti caldi ai terminali per assicurarti che tutte le connessioni siano serrate correttamente e che la resistenza sia equilibrata.
Cablaggio di batterie LiFePO4 in serie
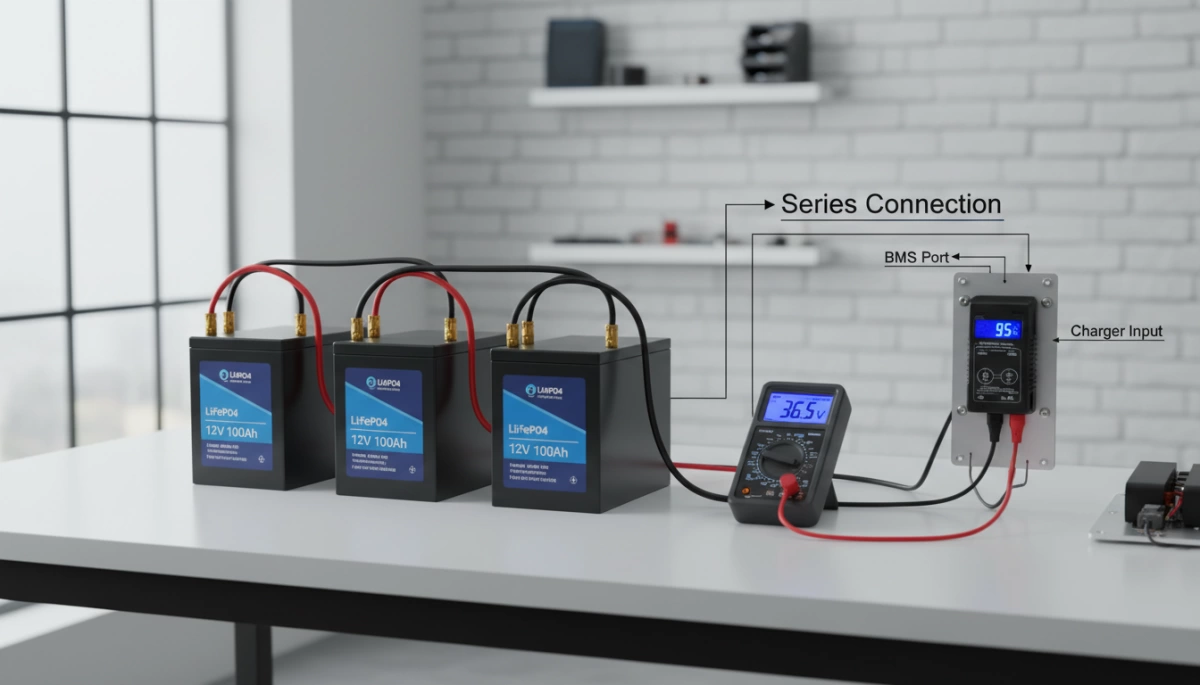
Quando è necessario aumentare la tensione del sistema senza modificare la capacità in ampere-ora, una connessione in serie LiFePO4 è la configurazione preferita. Questo è lo standard per costruire un Configurazione litio da 12V a 48V per energia fuori rete o motori trolling di uso intensivo. Collegando il terminale positivo di una batteria al terminale negativo della successiva, le tensioni si sommano mentre la capacità rimane quella di un singolo elemento.
Istruzioni passo-passo per il cablaggio in serie
Per garantire un banco ad alta tensione sicuro ed efficiente, segui questi passaggi:
- Prima l’equilibratura superiore: Assicurati sempre che ogni batteria sia completamente carica individualmente prima di collegarle.
- Collega i terminali: Collega il terminale negativo della Batteria A al terminale positivo della Batteria B.
- Uscita finale: Il polo positivo del tuo sistema si collega al terminale positivo rimanente sulla Batteria A, e il polo negativo si collega al terminale negativo rimanente sulla Batteria B.
- Usa hardware adeguato: Usa sempre cavi per batterie di lunghezza uguale del calibro corretto per prevenire resistenze disuniformi across the bank.
Scegliere un caricatore ad alta tensione o multi-banca
Quando caricare batterie LiFePO4 in parallelo e in serie guida configurazioni, il caricatore deve corrispondere alla tensione nominale totale. Per una stringa in serie da 24V, è necessario un caricatore LiFePO4 dedicato da 24V con un profilo specifico per il litio. In alternativa, consiglio spesso un caricatore multi-banca LiFePO4 sistema. Questo permette a ogni batteria nella stringa di essere caricata indipendentemente, il che è il modo più efficace per evitare che una batteria raggiunga una carica completa più velocemente delle altre.
Gestione del drift delle celle e bilanciamento in serie
La sfida più grande con le stringhe in serie è il “drift”, dove le batterie alla fine raggiungono stati di carica diversi. Anche con un modulo di controllo della batteria di alta qualità gestione delle celle interne le blocchi esterni da 12V possono diventare sbilanciati. Per risolvere questo, suggerisco uso di bilanciatore di batterie. Un bilanciatore attivo ridistribuisce costantemente energia tra le batterie in serie per mantenere i loro voltaggi identici. Senza questo, una batteria potrebbe raggiungere il suo limite di tensione alta prematuramente, causando lo spegnimento dell'intera banca anche se le altre batterie non sono piene. Controlli di manutenzione regolari con un multimetro ti aiuteranno a individuare questi squilibri prima che influenzino il tuo tempo di funzionamento.
Configurazioni miste in serie-parallelo
Quando le tue esigenze energetiche superano una configurazione semplice, mescolare connessioni in serie e parallelo è il modo migliore per scalare. Questa configurazione di banca di batterie al litio ti permette di aumentare sia la tensione del sistema che la capacità totale contemporaneamente. Ad esempio, se stai costruendo una banca di batterie solari off-grid ad alta capacità banca di batterie solari off-grid, potresti aver bisogno di più di una singola stringa di batterie per gestire il carico.
Quando combinare serie e parallelo
Consigliamo tipicamente queste configurazioni ibride per applicazioni di uso intensivo come il backup dell'intera abitazione o grandi imbarcazioni marine. Utilizzando una configurazione mista, puoi ottenere un Configurazione litio da 12V a 48V mentre raddoppiando o triplicando il tempo di funzionamento. La disposizione più comune è la configurazione 4S2P (4 batterie in serie, con due di queste stringhe collegate in parallelo). Questo crea un sistema ad alta tensione che rimane efficiente sotto scarica pesante.
Schemi di cablaggio per bancali complessi
Per cablare correttamente una banca 4S2P, devi prima creare due stringhe in serie separate.
- Passo 1: Collega quattro batterie in una connessione in serie LiFePO4 per raggiungere la tensione desiderata (ad esempio, 48V).
- Passo 2: Ripeti questo per la seconda stringa.
- Passo 3: Collega il terminale positivo della prima stringa a quello positivo della seconda, e fai lo stesso per i negativi.
Strategie di ricarica per configurazioni 4S2P
La ricarica di una banca mista richiede un caricabatterie ad alta potenza che corrisponda alla tensione totale delle stringhe in serie. Poiché queste banche sono complesse, comprendere il principio di carica e scarica delle batterie al litio è fondamentale per mantenere l'equilibrio tra tutte le celle.
- Usa un caricabatterie ad alta tensione singolo: Assicurati che sia valutato per la tensione totale della banca (ad esempio, un caricabatterie da 48V per una banca di batterie 4S2P da 12V).
- Busbar sono obbligatori: Usa busbar resistenti per garantire una distribuzione uniforme della corrente tra tutte le stringhe in parallelo.
- Connessioni di collegamento incrociato al punto medio: Per la massima stabilità, collega i punti medi delle tue stringhe in serie tra loro per permettere alle unità BMS di rimanere meglio allineate.
- Dimensionamento: Assicurarsi che tutti i cavi siano della stessa lunghezza e calibro per evitare resistenze diseguali, che possono portare a un funzionamento più gravoso di una stringa rispetto alle altre.
Carica di batterie LiFePO4 in parallelo e in serie: migliori pratiche e parametri
Consiglio di utilizzare un profilo di ricarica dedicato CC/CV (Corrente Costante/Tensione Costante) per qualsiasi configurazione di banco batterie al litio. Questo approccio a due fasi garantisce che le celle raggiungano la corretta tensione di ricarica LiFePO4 in modo sicuro ed efficiente. A differenza delle batterie al piombo-acido, il fosfato di ferro litio non richiede un algoritmo complesso a più fasi con desolfatazione o equalizzazione pesante.
Quando si selezionano unità da la nostra gamma di prodotti LiFePO4, è necessario assicurarsi che il caricabatterie sia impostato sui requisiti specifici del proprio setup in serie o parallelo. Per un banca di batterie solari off-grid, il controller di carica deve essere programmato con i seguenti parametri per evitare che il BMS si disconnetta.
Impostazioni di tensione di ricarica consigliate
| Tensione di sistema | Bulk / Assorbimento (100% SoC) | Tensione di flottante (Standby) | Soglia di interruzione a bassa tensione |
|---|---|---|---|
| 12V (4S) | 14,2V – 14,6V | 13,5V – 13,6V | 10,8V – 11,2V |
| 24V (8S) | 28,4V – 29,2V | 27,0V – 27,2V | 21,6V – 22,4V |
| 48V (16S) | 56,8V – 58,4V | 54,0V – 54,4V | 43,2V – 44,8V |
Sicurezza Essenziale di Corrente e Temperatura
Gestire il flusso di energia è fondamentale per la sicurezza del litio ferro fosfato e le prestazioni a lungo termine. Seguo queste regole rigorose per evitare il degrado prematuro delle celle:
- Tasso di Carica (C-Rate): Consiglio un tasso di carica standard di 0,5C (metà della capacità della batteria in ampere). Sebbene molte celle possano gestire valori più elevati, 0,5C rappresenta il miglior equilibrio tra velocità e longevità.
- Limiti di Temperatura: Non caricare mai le batterie LiFePO4 se la temperatura ambiente è inferiore a 0°C. La carica in condizioni di gelo provoca la placcatura del litio, che danneggia permanentemente le celle.
- Tempo di Assorbimento: Mantieni breve il tempo di assorbimento. Una volta che la corrente scende a circa 51% della capacità della batteria, il banco è completamente carico.
- Ottimizzazione Solare: Per applicazioni specializzate di illuminazione solare, ho impostato leggermente più basso il voltaggio di float per ridurre lo stress sulle celle quando rimangono ad un alto abbinamento dello stato di carica il ciclo solare giornaliero.
Seguendo questi parametri, mantieni l'equilibrio della chimica interna e garantisci che il BMS non debba intervenire a causa di sovraccarico o condizioni di sovratemperatura.
Il ruolo del Sistema di Gestione della Batteria (BMS)
Il Sistema di Gestione della Batteria (BMS) è il cervello della tua configurazione. Che tu stia gestendo un semplice array in parallelo o uno complesso Configurazione litio da 12V a 48V, il BMS agisce come un watchdog digitale. Monitora ogni singola cella per assicurarsi che rimangano entro limiti di sicurezza operativa, prevenendo guasti catastrofici e prolungando la vita del tuo investimento.
Come il BMS protegge le banche configurate
In qualsiasi configurazione di banco batterie al litio, il BMS fornisce strati critici di la sicurezza del litio ferro fosfato che le batterie tradizionali al piombo-acido semplicemente non possiedono:
- Protezione da Sovraccarico di Tensione: Disattiva l'ingresso se il tensione di ricarica LiFePO4 sale troppo in alto.
- Protezione da sovrascarica: Prevenire che la banca si scarichi fino a un punto in cui la chimica venga danneggiata permanentemente.
- Short Circuit & Sovracorrente: Disconnette istantaneamente il carico se rileva un guasto nel cablaggio o un'impennata massiccia.
- Gestione termica: Interrompe la carica se le temperature scendono sotto zero o salgono a livelli pericolosi.
Intervento del BMS durante lo squilibrio delle celle
Quando le celle si discostano in tensione, limita la capacità totale utilizzabile della tua banca. Proprio come la logica usata per bilanciare le batterie 18650 in confezioni più piccole, un BMS di alta qualità esegue un bilanciamento attivo o passivo. Se una cella raggiunge il suo picco prima delle altre, il BMS limiterà la carica o scaricherà l'eccesso di energia per permettere alle celle più lente di recuperare. Questo previene che un "colpo debole" interrompa l'intero sistema banca di batterie solari off-grid.
Monitoraggio del tuo banco tramite App Bluetooth
Le unità BMS moderne spesso integrano il Bluetooth, trasformando il tuo smartphone in una dashboard high-tech per il tuo connessione in serie LiFePO4 o banco parallelo. Questa visibilità cambia le regole del gioco per la manutenzione:
- Dati in tempo reale: Visualizza lo Stato di Carica (SoC) esatto e le tensioni delle singole celle.
- Diagnostica della salute: Rileva potenziali deriva o celle con prestazioni inferiori prima che causino un guasto al sistema.
- Monitoraggio della corrente: Controlla esattamente quanta corrente entra o esce dal tuo espansione della batteria al litio per veicoli ricreazionali.
- Allarmi istantanei: Ricevi notifiche se il BMS attiva un'interruzione di sicurezza a causa di problemi di temperatura o tensione.
Precauzioni di sicurezza e errori comuni
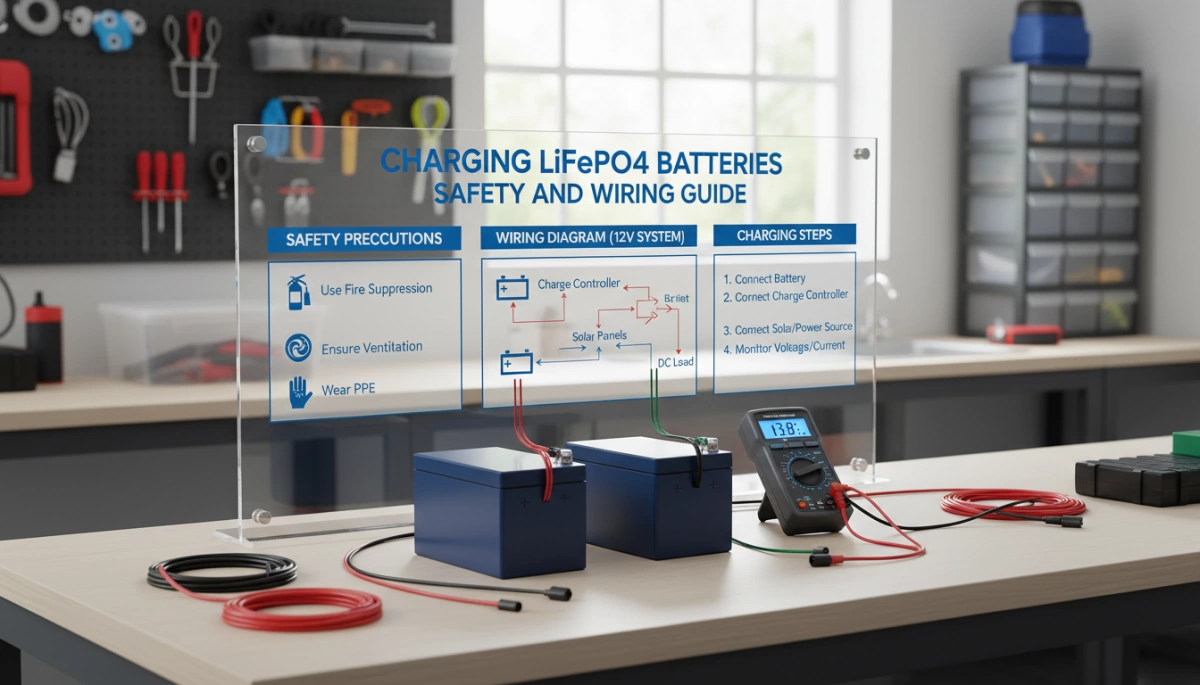
Costruire un sistema personalizzato configurazione di banco batterie al litio richiede alta corrente e componenti costosi. Non posso sottolineare abbastanza che i protocolli di sicurezza non sono opzionali. Una singola connessione allentata o un cavo sottodimensionato può portare a generazione significativa di calore, terminali fusi o addirittura a un rischio di incendio. Che tu stia lavorando con un semplice sistema a 12V o con un sistema ad alta tensione connessione in serie LiFePO4, rispettare rigorosi standard di cablaggio è l'unico modo per garantire longevità e sicurezza.
Dimensionamento dei cavi e specifiche di coppia
L'errore più comune che vedo nelle costruzioni fai-da-te è l'uso di cavi sottodimensionati. La corrente scorre come l'acqua; se il tubo (cavo) è troppo stretto, la pressione (calore) si accumula. Devi dimensionare i tuoi cavi in base alla corrente di scarica continua massima dell'intero banco, non solo di una singola batteria.
- Lunghezza uguale obbligatoria: Quando si cabla in parallelo, è necessario utilizzare cavi per batterie di lunghezza uguale per ogni connessione. Se un cavo è lungo sei pollici in più rispetto all'altro, quella batteria ha una resistenza maggiore, funziona di meno e provoca il sovraccarico delle altre batterie.
- Stringilo: Terminali allentati creano archi e calore. Usa una chiave dinamometrica per serrare i bulloni dei terminali esattamente secondo le specifiche del produttore. Sforzare troppo rovina i filetti; allentare troppo fonde i terminali.
Posizionamento del fusibile e rischi di cablaggio
Ogni conduttore non collegato a terra necessita di protezione. Installa un fusibile di alta qualità di Classe T o ANL sul cavo positivo principale, il più vicino possibile al terminale della batteria. Questo fusibile funge da guardiano per la sicurezza del litio ferro fosfato, interrompendo il circuito istantaneamente in caso di cortocircuito catastrofico.
Un cablaggio improprio porta spesso a spegnimenti immediati del BMS. Se per sbaglio inverti la polarità o crei un cortocircuito durante la configurazione di batterie in serie o in parallelo, il BMS è progettato per sacrificarsi per salvare le celle. Tuttavia, frequenti attivazioni possono danneggiare i FET. Se il tuo sistema interrompe spesso l'alimentazione in modo imprevisto, è spesso un meccanismo di protezione che si attiva. Comprendere le cause comuni di batterie che non si scaricano può aiutarti a capire se il tuo BMS si attiva a causa di guasti nel cablaggio o problemi di carico esterno.
Consigli di manutenzione per la longevità
Mentre il LiFePO4 è pubblicizzato come “senza manutenzione”, ciò si riferisce alla chimica interna, non alle connessioni esterne. Per mantenere il sistema funzionante per un decennio:
- Ritensione annuale: Le vibrazioni in camper e barche allentano i dadi nel tempo. Controllali una volta all'anno.
- Pulizia delle connessioni: Assicurati che i terminali siano privi di polvere e corrosione.
- Controlla il rigonfiamento: Ispeziona visivamente il contenitore della batteria. Qualsiasi gonfiore indica stress interno grave o guasto.
Risoluzione dei problemi della configurazione del tuo banco batterie LiFePO4
Anche con una configurazione perfetta, un banco batterie può discostarsi nel tempo. Identificare i problemi precocemente previene la perdita permanente di capacità e mantiene il sistema al massimo dell'efficienza. Faccio sempre attenzione a segnali di allarme specifici che indicano uno squilibrio nel tuo configurazione di banco batterie al litio.
Riconoscere i Segnali di Squilibrio del Banco Batterie
Se il tuo inverter si spegne prematuramente o la capacità sembra inferiore al solito, probabilmente hai uno squilibrio. In un connessione in serie LiFePO4, una batteria può raggiungere il suo limite di tensione alta prima delle altre, causando lo spegnimento del sistema di gestione della batteria (BMS) di spegnere l'intera stringa. I sintomi comuni includono:
- Interruzione Prematura del BMS: Il caricatore si ferma anche se la tensione totale del banco è sotto il target.
- Divergenza di Tensione: Le tensioni delle singole batterie differiscono di più di 0,1V a riposo o durante la carica.
- Rapido Calo di Tensione: La tensione di una batteria diminuisce significativamente più velocemente delle altre sotto un carico pesante.
Diagnosi e Ribilanciamento delle Celle
Per riparare un banco squilibrato, è necessario isolare le batterie problematiche. Usa un multimetro di alta qualità per controllare la tensione di ogni unità. Se trovo una variazione significativa, eseguo una procedura manuale di bilanciamento superiore LiFePO4 per sincronizzare il abbinamento dello stato di carica in tutto il banco.
- Isolare le Batterie: Disconnetti tutti i cavi in serie o parallelo per trattare ogni batteria come un'unità autonoma.
- Carica Individuale: Utilizzare un caricabatterie dedicato LiFePO4 per portare ogni batteria a 100% singolarmente.
- Reset in parallelo: Collegare tutte le batterie completamente cariche in parallelo e lasciarle riposare per 24 ore per equalizzare le loro tensioni interne.
- Verifica: Assicurarsi che tutte le batterie mostrino letture di tensione identiche prima di rimontare il tuo Configurazione litio da 12V a 48V.
Mantenere una banca sana richiede la comprensione che fattori da considerare nella progettazione e produzione di batterie al litio influiscono direttamente sul loro comportamento in una configurazione a lungo termine. Controlli di manutenzione regolari sulla coppia dei cavi e sulla pulizia dei terminali sono anche essenziali per prevenire squilibri legati alla resistenza. Se una batteria non riesce costantemente a mantenere la sua carica rispetto alle altre, potrebbe essere il momento di sostituire quella specifica unità per proteggere la salute complessiva del tuo banca di batterie solari off-grid.