La batteria al litio 18650 è la spina dorsale dell'energia portatile moderna. Dai generatori solari fai-da-te alle e-bike ad alte prestazioni, imparare come collegare le batterie 18650 in modo sicuro ed efficace sblocca infinite possibilità di stoccaggio di energia. Ma un passo falso potrebbe portare a surriscaldamenti, celle danneggiate o peggio. Come professionista produttore di pacchi batteria 18650, scrivo questa guida per aiutarti a padroneggiare le configurazioni in serie/parallelo, scegliere gli strumenti giusti e evitare gli errori più comuni (e pericolosi).
Comprendere le batterie 18650: Capacità, Tensione e Chimica
La cella 18650 (diametro di 18mm, lunghezza di 65mm) fornisce una tensione nominale di 3,7V e una capacità fino a 3500mAh, superando le alternative al piombo-acido di 200% in densità energetica. Tuttavia, collegare queste celle richiede precisione:
- Statistiche Chiave:
– Tensione nominale: 3.7V per cella
– Tensione di carica: 4.2V (±0.05V)
– Soglia di scarica: 2.5V (mai scendere sotto!)
– Corrente continua massima: Variabile (Samsung 25R = 20A, Panasonic NCR18650B = 6.8A)
Consiglio professionale: Usa celle di marchi affidabili come >60°C, Samsung o LG—evitare marche “Fire” (Ultrafire, Surefire) con specifiche gonfiate e rischi per la sicurezza.
Serie vs. Parallelo: Configurazioni di Abbinamento al Tuo Progetto
Connessioni in Serie (Impilamento di Tensione)
- Caso d'Uso: Necessità di tensione più alta (ad esempio motori di e-bike, generatori solari)
- Panasonic: Tensione totale = Tensione della cella × Numero di celle in serie
– Esempio: 3S = 3 × 3.7V = 11.1V - I rischi: Le celle sbilanciate possono sovraccaricare/danneggiare il pacco. Usa sempre un BMS!
Connessioni in parallelo (Aumento della capacità)
- Caso d'Uso: Durata più lunga per power bank, torce
- Panasonic: Capacità totale = Capacità della cella × Gruppi in parallelo
– Esempio: gruppi di 5P di celle da 3400mAh = 17.000mAh - I rischi: Le celle devono avere tensione identica (±0,1V) prima di collegarle.
Strumenti e materiali di cui avrai bisogno
- Elementi essenziali:
– Saldatrice a spot (consigliato SUNKKO 709A)
– Strisce di nichel puro (spessore 0.15mm per carichi <20A)
– BMS 3S-4S (valutazione di scarica di 25A per e-bike)
– Supporti/spaziatori per celle (antivibrazione)
– Occhiali di sicurezza e guanti resistenti al fuoco - Opzionali:
– Custodia stampata in 3D (previene cortocircuiti accidentali)
– Indicatore di livello della batteria (monitorare la tensione del pacco)
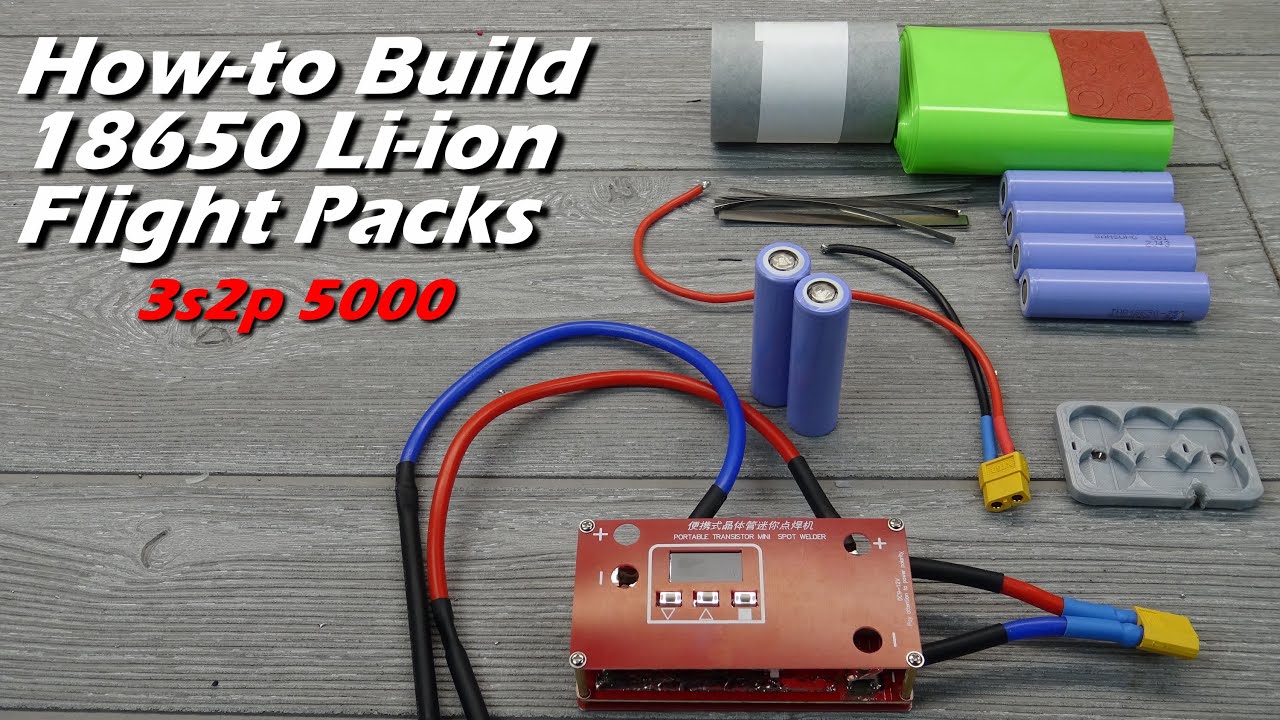
Passo dopo passo: Costruzione di un pacco batteria 3S5P 18650 (11,1V, 17Ah)
Fase 1: Abbinamento della tensione
- Critico: Testare tutte le celle con un multimetro. I gruppi in parallelo devono essere entro 0,05V.
– Caricare celle non abbinate = rischio 🔥!
Fase 2: Disporre le celle nel supporto
– Prima gruppi 5P (5 celle affiancate), poi impilare 3 gruppi in serie.
– Usare supporti per il flusso d'aria—previene il surriscaldamento durante scariche da 25A.
Fase 3: Saldatura a punti
- Tagliare le strisce di nichel per collegare i terminali:
– 4 strisce lunghe (connessioni in parallelo)
– 10 strisce corte (salti in serie)
Impostazioni: Strisce da 0,15mm → impulso 4P, regolatore di corrente 5/10. Testare le saldature tirando!
Fase 4: Installare il BMS 3S
– Collega B- al negativo del primo gruppo, B1 al secondo gruppo, B2 al terzo, B+ al positivo finale.
– Nota: Saldare le estremità di nichel alle placche del BMS per connessioni robuste.
Fase 5: Chiudere e Testare
– Proteggi il pacco in una custodia stampata in 3D con viti M3.
– Carica usando un caricabatterie CC/CV da 12,6V. Non superare mai 4,25V per cella!
Regole di sicurezza da non ignorare
1. Nessuna saldatura diretta alle celle
Il calore residuo degrada la chimica del litio. La saldatura a punti è 10 volte più sicura.
2. Usa sempre un BMS
Previene sovraccarichi (incendio) e scariche eccessive (celle morte).
3. Monitorare le temperature
Le celle non devono mai superare i 60°C durante l'uso.
Avanzato: Metodi senza saldatura (Applicazioni a bassa corrente)
– Supporti a molla: Max 5A per cella—ideale per dispositivi a basso assorbimento come luci LED.
– Adesivo conduttivo: MG Chemicals 8331 (assicurarsi che le celle siano fissate meccanicamente).
Avviso: Questi metodi introducono resistenza. Evitare per progetti >10A!
Considerazioni finali: Come padroneggiare il collegamento delle batterie 18650
Che tu stia costruendo una power bank solare o aggiornando un e-bike, come colleghi le batterie 18650 determina la sicurezza e l'efficienza del tuo progetto. Prioritizza le strisce di nichel saldate a punti, un BMS di qualità e celle di marca. Hai domande? Scrivile qui sotto—rispondiamo a ogni commento!


