Więc chcesz wiedzieć jak ładować akumulator 18650 za pomocą panelu słonecznego?
Dobry krok.
Ładowanie słoneczne tych potężnych ogniw litowo-jonowych to jeden z najlepszych sposobów na tworzenie przenośnych, niezależnych od sieci zasilaczy. Niezależnie od tego, czy budujesz system awaryjnego zasilania, czy zasilać odległy sensor, ten zestaw może zaoszczędzić Ci sporo pieniędzy, jednocześnie utrzymując Twoje urządzenia w pracy 24/7.
Ale jest jedna rzecz:
Zepsujesz to, a czeka Cię spalone akumulator. A może coś gorszego.
Dobra wiadomość? Pokażę Ci dokładnie, jak to zrobić bezpiecznie i skutecznie.
W tym przewodniku, jako profesjonalista producent pakietów baterii 18650, podzielę się:
- Niezbędne komponenty, których potrzebujesz (i dlaczego każdy z nich ma znaczenie)
- Proces krok po kroku, który naprawdę działa
- Częste błędy, które mogą zniszczyć twoje baterie
- Profesjonalne wskazówki, jak zmaksymalizować wydajność ładowania
Zanurzmy się w to.
Dlaczego ładowanie słoneczne akumulatorów 18650 ma sens
Zanim przejdziemy do instrukcji, pozwól, że szybko wyjaśnię, dlaczego to połączenie jest tak potężne.
Baterie 18650 magazynują niesamowitą gęstość energii w małym opakowaniu. Mówimy o pojemności od 2000 do 3500mAh w czymś wielkości Twojego kciuka.
Połącz to z darmową energią słoneczną?
Masz wygraną kombinację do:
- Zdalnych czujników IoT
- Awaryjnych ładowarek telefonów
- Powerbanków do sprzętu kempingowego
- Systemów kamer bezpieczeństwa
- DIY generatorów słonecznych
Najlepsza część? Gdy to ustawisz, działa samo. Słońce wschodzi, bateria się ładuje. Proste jak to.
Niezbywalne Ostrzeżenie Bezpieczeństwa
Spójrz:
Muszę być absolutnie jasny w jednej sprawie.
Nigdy nie podłączaj panelu słonecznego bezpośrednio do baterii 18650.
Widziałem, jak ludzie próbują tego „skrót” i zawsze kończy się to źle. Bez odpowiedniej kontroli ładowania, przeładujesz akumulator. A przeładowane litowo-jonowe baterie nie tylko zawodzą – mogą się zapalić lub explode.
Nie warto ryzykować.
Rozwiązanie? Użyj odpowiedniego kontrolera ładowania. Co prowadzi nas do…
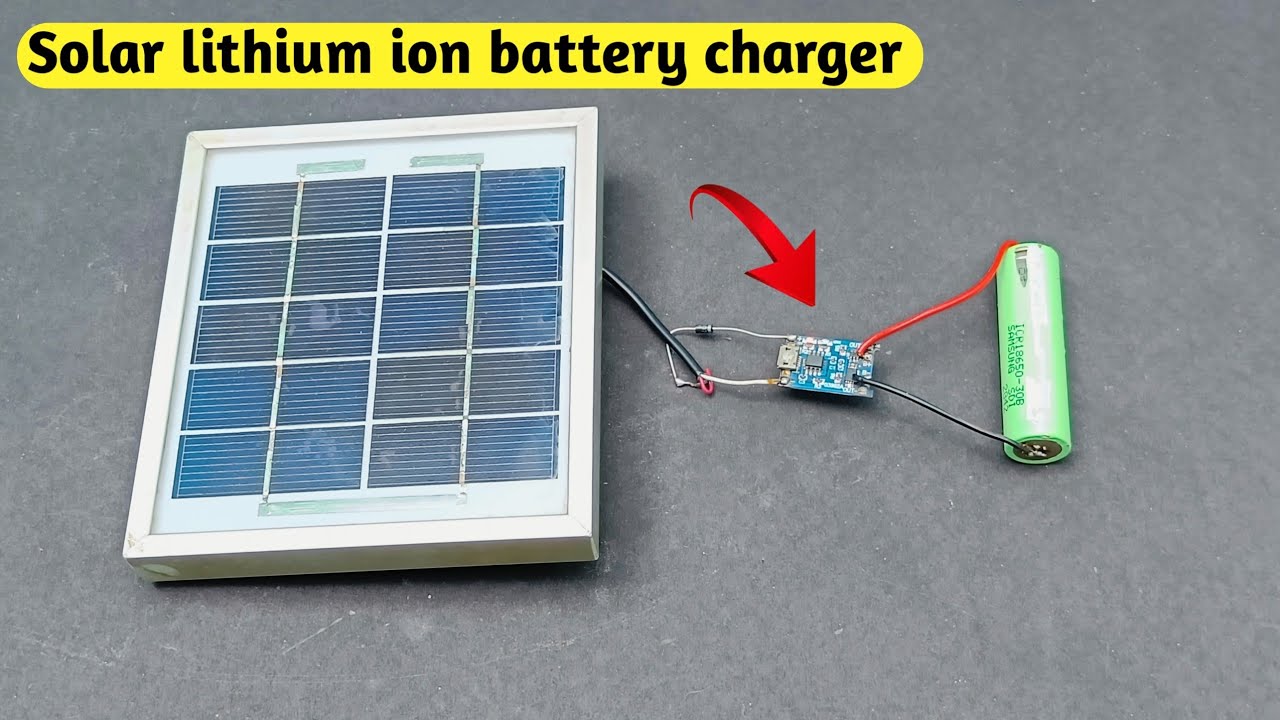
Podstawowe elementy, których będziesz potrzebować
Oto dokładnie to, czego potrzebujesz, aby bezpiecznie naładować 18650 za pomocą energii słonecznej:
1. Moduł ładowania TP4056
Ta mała płytka obwodu jest MVP Twojego zestawu. TP4056 obsługuje całą złożoną logikę ładowania:
- Ogranicza napięcie do bezpiecznego maksymalnie 4,2V
- Kontroluje prąd ładowania
- Zapewnia ochronę przed przeładowaniem
- Pokazuje status ładowania za pomocą diod LED
W około $2 za sztukę, to tanie ubezpieczenie przed katastrofami z akumulatorami.
2. Panel słoneczny (wyjście 5-6V)
Twój panel słoneczny musi generować napięcie 5-6 woltów, aby współpracować z TP4056. Oto, co polecam:
- Panele 5V świetnie sprawdzają się w systemach kompatybilnych z USB
- Panele 6V ładują nieco szybciej przy słabym świetle
- Celuj w 5-10W do ładowania pojedynczej baterii
Porada eksperta: Monokrystaliczne panele lepiej radzą sobie w częściowym cieniu niż polikrystaliczne. Warto wydać te kilka złotych więcej.
3. Bateria 18650 i uchwyt
Jakość ma tutaj znaczenie. Szukaj:
- Chronionych ogniw z wbudowanymi układami bezpieczeństwa
- Baterii markowych (Samsung, LG, Panasonic)
- Odpowiednich uchwytów na baterie z sprężynowymi kontaktami
Unikaj tajemniczych baterii od nieznanych sprzedawców. Zazwyczaj są to recyklingowane ogniwa z zawyżonymi deklaracjami pojemności.
4. Diody Schottky (1N5819)
Zapobiega przepływowi prądu wstecznego, gdy słońce zachodzi. Bez niej, bateria powoli rozładowuje się z powrotem przez panel słoneczny w nocy.
5. Przewody i złącza
Zaopatrz się w:
- Przewód 22AWG do połączeń
- Materiały do lutowania lub złącza crimpowe
- Tuba termokurczliwa do izolacji
Jak naładować baterię 18650 za pomocą panelu słonecznego
Dobra, zbudujmy to.
Krok 1: Przygotuj swój moduł TP4056
Najpierw sprawdź prąd ładowania swojego modułu. Większość jest ustawiona na 1A domyślnie, co jest idealne dla większości 18650.
Jeśli musisz go dostosować:
- Rezystor 1,2kΩ = ładowanie 1A
- Rezystor 2kΩ = ładowanie 0,6A (łagodniejsze dla baterii)
- Rezystor 10kΩ = 0,13A (ładowanie powolne)
Krok 2: Dodaj ochronę przeciwzwarciową
Oto gdzie przydaje się dioda Schottky’ego:
- Podłącz anodę diody (koniuszek bez pasków) do dodatniego przewodu panelu słonecznego
- Podłącz katodę (z paskiem) do pola IN+ na TP4056
- Podłącz ujemne zasilanie panelu słonecznego bezpośrednio do IN-
Ten element zapobiega wielu problemom w przyszłości.
Krok 3: Podłącz wejście słoneczne
Czas na podłączenie panelu słonecznego:
- Przylutuj lub podłącz wyjście diody do TP4056 IN+
- Podłącz ujemne zasilanie panelu słonecznego do TP4056 IN-
- Użyj termokurczliwego na wszystkich połączeniach
Podwójnie sprawdź polaryzację. Naprawdę. Potrójnie sprawdź.
Krok 4: Podłącz Akumulator
Teraz do sedna sprawy:
- Włóż swój 18650 do uchwytu
- Podłącz dodatni uchwyt do TP4056 B+
- Podłącz ujemny uchwyt do TP4056 B-
Diody LED na module powinny się zaświecić, jeśli na panelu jest słońce.
Krok 5: Przetestuj wszystko
Zanim zaufasz temu zestawowi:
- Zmierz napięcie panelu słonecznego (powinno wynosić 5-6V w słońcu)
- Sprawdź napięcie akumulatora (zakres 3,3-4,2V)
- Zweryfikuj, czy dioda ładowania aktywuje się w świetle słonecznym
- Obserwuj pierwszy pełny cykl ładowania
Oczekiwania dotyczące wydajności w rzeczywistych warunkach
Pozwól, że ustalę realistyczne oczekiwania.
Panel słoneczny o mocy 5W w dobrym nasłonecznieniu dostarcza około 1A prądu ładowania. Dla akumulatora 2500mAh zaczynającego od poziomu 50%:
- Pełne słońce: 2-3 godziny do pełnego naładowania
- Częściowo pochmurno: 4-6 godzin
- Ciężkie zachmurzenie: może nie naładować się w pełni
Pogoda ma znaczenie. Bardzo duże.
Testowałem ten dokładny zestaw przez ponad miesiąc w 2025 roku. Średnio, moje baterie osiągają pełne naładowanie do 14:00 w słoneczne dni. Dni pochmurne? Szczęściarz, aby uzyskać 70% naładowania.
Maksymalizacja Efektywności Ładowania Słonecznego
Chcesz lepszą wydajność? Oto, co naprawdę działa:
Pozycja panelu ma znaczenie
Ustaw panel pod kątem prostym do słońca. Brzmi oczywiście, ale widuję panele zamontowane płasko wszędzie. Tracisz wtedy ponad 30% wydajności.
Utrzymuj panele w czystości
Kurz i odchody ptaków zabijają wydajność. Cotygodniowe czyszczenie wilgotną szmatką utrzymuje wszystko w dobrej kondycji.
Zarządzanie temperaturą
Moduły TP4056 nagrzewają się podczas ładowania. Zamontuj je na małym radiatorze lub metalowej powierzchni, aby lepiej odprowadzać ciepło.
Gorące baterie ładują się wolniej i szybciej się zużywają. Jeśli to możliwe, trzymaj swój zestaw w cieniu.
Używaj wysokiej jakości kabli
Cienkie przewody = spadek napięcia = wolniejsze ładowanie. Używaj przewodów 22AWG lub grubszych na odcinkach poniżej 1 metra.
Typowe błędy, które niszczą baterie
Widzę każdy możliwy sposób, aby to zepsuć. Ucz się na błędach innych:
Błąd #1: Pomijanie kontrolera ładowania
„Czy nie mogę po prostu użyć diody, aby ograniczyć napięcie?”
Nie. Po prostu nie.
Diody obniżają napięcie, ale go nie regulują. Twoja bateria nadal się przegrzewa w słoneczne dni.
Błąd #2: Nieprawidłowe napięcie panelu słonecznego
Panele 12V potrzebują regulatorów napięcia. Panele 3V niczego nie naładują. Trzymaj się paneli 5-6V dla modułów TP4056.
Błąd #3: Mieszanie starych i nowych baterii
Ładowanie równoległe wielu 18650? Powinny być dopasowane pod względem wieku i pojemności. Niezgodne ogniwa tworzą niebezpieczne nierównowagi.
Błąd #4: Ignorowanie temperatury
Ładowanie poniżej zera stopni uszkadza baterie na stałe. Powyżej 45°C (113°F) jest równie szkodliwe.
Wbuduj monitorowanie temperatury w krytyczne systemy.
Rozwiązywanie problemów z ładowarką słoneczną
Nie działa zgodnie z oczekiwaniami? Oto Twoja lista kontrolna:
Brak diody ładowania:
- Sprawdź napięcie panelu słonecznego (czas multimetru)
- Zweryfikuj wszystkie połączenia
- Przetestuj z zasilaniem USB, aby wyizolować problemy z panelem
Powolne ładowanie:
- Wyczyść panel słoneczny
- Sprawdź czy nie jest częściowo zacieniony
- Zmierz rzeczywisty prąd ładowania
- Sprawdź czy połączenia nie są skorodowane
Bateria nie trzyma naładowania:
- Przetestuj baterię w innym urządzeniu
- Sprawdź czy nie doszło do uszkodzenia przez nadmierne rozładowanie
- Może być konieczna wymiana baterii
TP4056 się nagrzewa:
- Normalne podczas szybkiego ładowania
- Dodaj radiator, jeśli jest to niepokojące
- Zmniejsz prąd ładowania, jeśli to konieczne
Zaawansowane modyfikacje
Gotowy na podniesienie poziomu? Oto kilka ulepszeń:
Dodaj wyjście USB
Wiele modułów TP4056 zawiera układ wyjścia USB. Idealne do ładowania telefonów.
Zarządzanie wieloma bateriami
Chcesz naładować wiele ogniw 18650? Będziesz potrzebować:
- Oddzielny TP4056 dla każdej baterii (najbezpieczniejszy)
- LUB odpowiedni BMS dla konfiguracji szeregowych
- Nigdy nie ładuj równolegle bez ochrony
Zabezpieczenie przed warunkami atmosferycznymi
Do instalacji na zewnątrz:
- Pokryj swoje płytki obwodów warstwą konformalną
- Używaj obudów odporne na warunki atmosferyczne
- Dodaj otwory odpływowe (woda dostanie się do środka)
- Używaj połączeń klasy morskiej
Zarządzanie ścieżką zasilania
Zaawansowani budowniczowie dodają obwody dzielące obciążenie. To pozwala na korzystanie z baterii podczas ładowania bez zakłócania cyklu ładowania.
Budowa vs Kupno
Prawdziwa rozmowa:
Możesz kupić komercyjne ładowarki słoneczne 18650 za $20-30. To dlaczego samemu budować?
- Naucz się cennych umiejętności
- Dostosuj do swoich dokładnych potrzeb
- Możliwość naprawy i ulepszania
- Często tańsze dla wielu jednostek
- Znacznie bardziej satysfakcjonujące
Powiedzmy sobie szczerze, jednostki komercyjne mają sens w pojedynczych projektach, gdzie niezawodność jest najważniejsza.
Podsumowanie najlepszych praktyk bezpieczeństwa
Ponieważ to jest wystarczająco ważne, aby powtórzyć:
- Zawsze używaj obwodów kontrolujących ładowanie – Brak bezpośrednich połączeń
- Monitoruj temperaturę ładowania – Przestań, jeśli baterie się nagrzewają
- Używaj wysokiej jakości komponentów – Zwłaszcza baterie i regulatory ładowania
- Regularnie sprawdzaj połączenia – Korozja się pojawia
- Przechowuj baterie właściwie Ładuj 40-60% do długoterminowego przechowywania
Prawdziwe przykłady projektów
Pozwól, że pokażę Ci to w działaniu:
Zdalna stacja pogodowa: Panel 6V 10W + 2x 18650 równolegle. Zasilanie Arduino i czujników przez tygodnie bez słońca.
Awaryjny ładowarka do telefonu: Panel 5V 5W + pojedyncza 18650 + moduł podnoszący USB. Pasuje do plecaka, ładuje telefon 2-3 razy na baterię.
Oświetlenie ogrodowe solarne: Panel 5V 2W + 18650 + sterownik LED. Napędza LED 5W przez 8+ godzin każdej nocy.
Każdy projekt nauczył mnie czegoś nowego o optymalizacji tych systemów.
Podział kosztów
Porozmawiajmy o pieniądzach:
- Moduł TP4056: $2-3
- Panel słoneczny 5V 5W: $10-15
- Bateria 18650: $5-10
- Uchwyt i części: $3-5
Razem: $20-35
Porównaj to z komercyjnymi rozwiązaniami za $50+ i zobaczysz, dlaczego DIY ma sens.
Rozważania na przyszłość na 2025 rok
Technologia stale się rozwija:
- Nowe warianty TP4056 obejmują wejście USB-C
- LiFePO4 18650 stają się coraz bardziej dostępne (potrzebne inne ładowarki)
- Zintegrowane panele słoneczne Opus BT-C3100 sterowniki w małych obudowach
- Lepsza chemia baterii = dłuższa żywotność
Zachowaj elastyczność w swoich projektach, aby umożliwić ulepszenia.
Podsumowanie
Ładowanie słoneczne baterii 18650 otwiera mnóstwo możliwości dla przenośnego i off-grid zasilania.
Kluczem jest robienie tego bezpiecznie, z odpowiednią kontrolą ładowania.
Zacznij od prostego układu z jedną baterią. Opanuj podstawy. Następnie rozwijaj się do bardziej skomplikowanych projektów, gdy Twoje umiejętności rosną.
Pamiętaj: moduł TP4056 jest Twoim przyjacielem. Używaj go. Szanuj moc tych baterii. I ciesz się satysfakcją z pozyskiwania darmowej energii ze słońca.
Postępuj zgodnie z tym przewodnikiem na jak ładować akumulator 18650 za pomocą panelu słonecznego, a będziesz mieć niezawodny, bezpieczny system ładowania, który będzie działał przez wiele lat.