12V 18650 Pil Paketi Nasıl Sıfırdan Yapılır
Kendi özel 12V 18650 lityum iyon pilin kapasitesini bilmek paketinizi yapmak korkutucu görünebilir. Ama size tüm süreci adım adım anlatacağım.
En yeni DIY projenizi güçlendirmek için kompakt bir 12V pil oluşturmak veya eski bir SLA pilinizi değiştirmek istiyorsanız, kendi 18650 paketinizi yapmak şaşırtıcı derecede basittir.
Bu kılavuzda şunları öğreneceksiniz:
- Gerekli 18650 hücre sayısını nasıl hesaplayacağınızı
- Doğru 18650 hücreleri nasıl seçeceğinizi
- Pil tutucu seçenekleri
- Kablolama yapılandırmaları
- Bir BMS (pil yönetim sistemi) ekleme
- Yeni pilinizi şarj etme ve boşaltma
Ve çok daha fazlası.
Güvenlik gözlüklerinizi takın ve işe koyulalım!
Neden Kendi 12v Pil Paketinizi Yapmalısınız?
İçeriye dalmadan önce, merak ediyor olabilirsiniz — neden kendi 12v lityum iyon pilinizi yapmanın zahmetine giriyorsunuz?
İşte DIY yapanların kendi paketlerini yapma ana nedenleri:
Para Tasarrufu
Hazır 12v lityum piller $100 ile $300+ arasında maliyetli olabilir.
Bireysel 18650 hücreler ve temel bir tutucu temin ederek, maliyetin çok altında özel bir pil oluşturabilirsiniz.
Özelleştirilmiş Özellikler
Marketlerde satılan 12v SLA pil satın aldığınızda, muhtemelen tam ihtiyaçlarınıza uygun olmayacaktır.
Ancak DIY 18650 paketi ile voltajı, kapasiteyi, deşarj oranını ve daha fazlasını belirleyebilirsiniz.
Kompakt Boyut ve Ağırlık
Bir 12v 5Ah 18650 pil paketi, eşdeğer kurşun-asit tuğlaya göre çok daha az yer kaplar. Ve çok daha hafiftir.
Boyut ve ağırlığın önemli olduğu durumlar için mükemmeldir (örneğin taşınabilir pil kutuları, drone, robotik projeleri vb.).
Yeniden Kullanılabilirlik
Bir SLA pil bittiğinde, genellikle yolun sonu olur. Ama özel 18650 paketi ile aşınmış hücreleri zamanla değiştirebilir ve devam edebilirsiniz.
Tamam, faydalar kapsandı, hadi pil yapımına hazırlık yapmaya başlayalım!
12v 18650 Pil Paketi Nasıl Yapılır?
Adım 1: 12v için Hücre Sayısını Hesaplama
Her DIY lityum iyon pilin temelini bireysel 18650 hücreler oluşturur.
Yani, kablolama yapılandırmaları veya pil koruması hakkında endişelenmeden önce, önce 12v paketimiz için kaç hücreye ihtiyacımız olduğunu bilmemiz gerekiyor.
İşte basit formül:
Toplam voltaj ÷ Hücre voltajı = Seri bağlanan hücre sayısı
Şimdi sayıları yerine koyalım.
Bir 18650 hücresinin standart voltaj aralığı şudur:
- 3.6v (Nominal)
- 4.2v (Maksimum şarj)
- 2.5v (Deşarj kesme noktası)
Bir 12v pil paketi için, hesaplamamızda nominal 3.6v değerini kullanacağız:
12v ÷ 3.6v = 3.33
Yuvarlayarak bize verir: Seri bağlanan 4 hücre.
Ancak, 3 hücreyi seri bağlayarak (yaklaşık 10.8v) pilimizden biraz daha fazla kapasite elde edebiliriz. Bu, pil yönetim sistemi tamamen güç kesmeden önce biraz tampon sağlar.
Yani karar şu…Seri bağlanan 3 lityum iyon hücre bize ihtiyacımız olan voltajı sağlar.
Şimdi 18650'lerimizi temin etme zamanı!
Adım 2: Kaliteli 18650 Hücreleri Seçmek
Tüm lityum iyon hücreleri eşit değildir.
18650 pil piyasası, uygun fiyatlı ve iyi görünüyor gibi görünen ultra ucuz hücrelerle dolu. Ama bana güvenin, bu düşük kaliteli hücreler size sadece baş ağrısı yaşatır.
Bunun yerine, şu gibi üst markalardan yüksek performanslı hücreler istiyorsunuz:
Samsung
Samsung, gezegendeki en iyi lityum iyon hücrelerinden bazılarını üretir. Parlak yeşil 18650'leri benim favorim.
Samsung INR18650 35E, performans ve maliyeti dengeleyen çok popüler bir seçimdir.
LG
Güçlü vaping pilleriyle tanınan LG’nin 18650 serisi hayal kırıklığına uğratmaz.
LG MH1, sağlam 3.000 mAh kapasite sunar.
Sony
Güvenilir teknoloji için her zaman Sony’ye güvenebilirsiniz. Ve VTC 18650 pilleri bunu sağlar.
Yüksek 30 amper sınırı ve 3.000 mAh derecesiyle Sony VTC6 hücresinin hayranıyım.
Bunlardan biri büyük markalardan biriyle kalın ve harika bir başlangıç yapmış olursunuz.
Şimdi bir sonraki adıma geçelim…
Adım 3: Bir 18650 Pil Tutucu Edinin
18650 hücrelerinizi aldıktan sonra, onları fiziksel olarak bağlayacak bir şeye ihtiyacınız var.
İki seçeneğiniz var:
Nikel Şeritler ile Nokta Kaynaklı Kaynaklama
Nokta kaynaklama, özel bir kaynak makinesi kullanarak ince nikel şeritleri 18650 hücrenin pozitif ve negatif terminallerine eritmek anlamına gelir.
Bu, ultra güvenli bir bağlantı oluşturur. Ama kaynak makinesi maliyeti 2000 TL’den fazladır.
Plastik Pil Tutucu Kullanmak
Çoğu DIY meraklısı için, plastik 18650 pil tutucu tercih edilen yoldur.
Bu tutucular birden fazla hücreyi yan yana sıralar ve hücre üzerinde gerilim tutmak için yaylı uçlara sahiptir. Bir JST konnektörlü iki tel, ilk ve son hücrelerin terminallerine takılır.
Bu tutucuları seviyorum çünkü çocuklar bile kullanabilir. Gelişmiş lehimleme becerileri gerekmez!
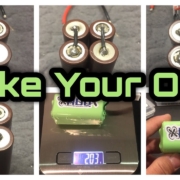
Kaliteli 18650 tutucuları Amazon veya Banggood gibi sitelerde $10 altında bulabilirsiniz. Sadece tutucunuzun ihtiyaç duyulan hücre sayısıyla uyumlu olduğundan emin olun (bizim durumda, seri bağlı 3 hücre).
Adım 4: Hücreleri Seri Bağla
12V (veya ona yakın) elde etmek için, hücrelerin uçtan uca seri bağlanması gerekir.
Bu, voltajın toplamını sağlar, böylece hücreler birbirine bağlanır.
Hücreleri şu şekilde düzenleyin:
Hücre 1 pozitif terminal yukarı bakar ve negatif terminal aşağı bakar.
Hücre 2 pozitif terminal aşağı bakar ve negatif terminal yukarı bakar.
Hücre 3 pozitif terminal yukarı bakar ve negatif terminal aşağı bakar.
Plastik tutucuya yerleştirildikten sonra, hücreler otomatik olarak uçtan uca bağlanır.
O yaylı terminaller sıkı bir uyum sağlar.
Sonra, kırmızı ve siyah tutucu tellerinizi projenize bağlarsınız ve artık ~12V DC güç elde edersiniz!
Ancak şarj etmeden önce önemli bir güvenlik adımı var…
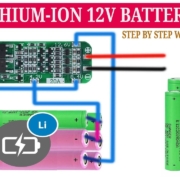
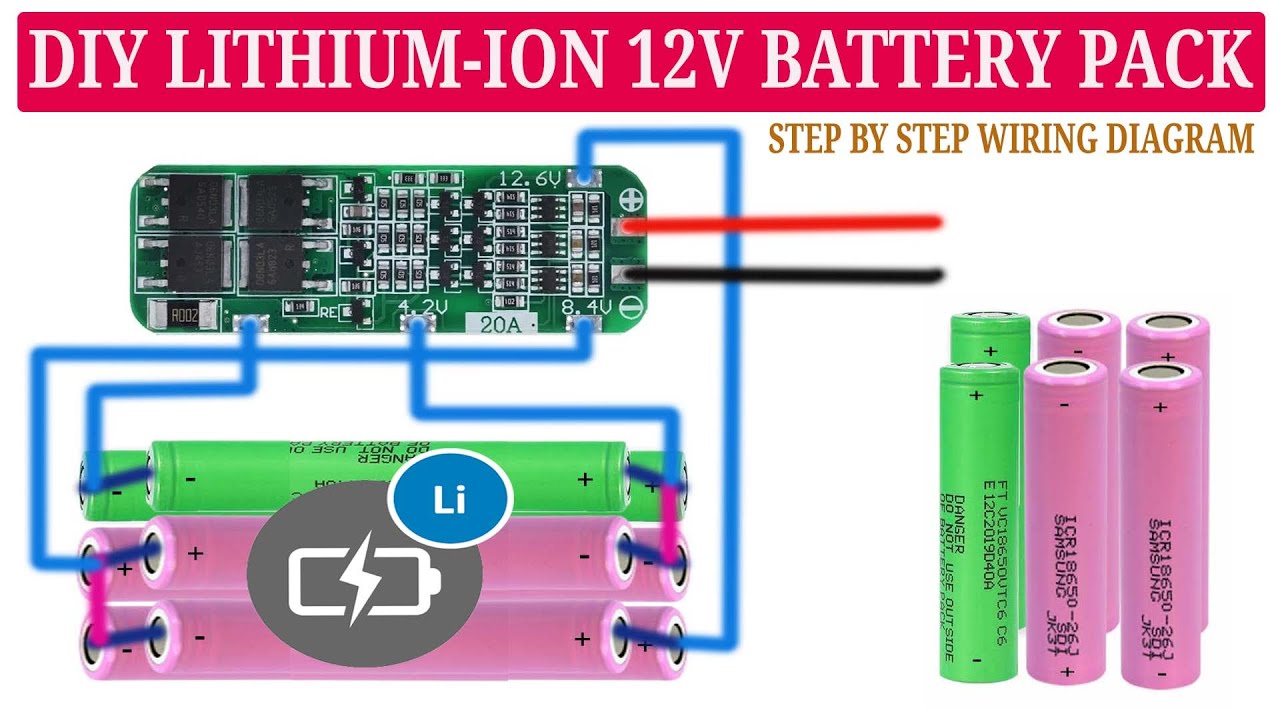
Adım 5: BMS Kur
Bir pil yönetim sistemi (BMS), çıplak 18650 hücrelerinden lityum iyon pil paketleri oluştururken çok önemlidir.
İşte bir BMS'nin yaptığı birkaç kritik görev:
- Hücrelerin aşırı deşarjını önler
- Aşırı şarjı durdurur
- Tüm hücreleri aynı voltajda dengeleyin
- Hücre sıcaklığı çok yüksek olursa kesilir
Bir BMS olmadan, lityum iyon piller son derece tehlikeli olabilir. Aşırı ısınabilir, yangın çıkarabilir veya patlayabilirler.
BMS olmadan güvenlik yoktur. Bunu yeterince vurgulayamam.
Neyse ki, 3-4 hücrelik paketler için tasarlanmış küçük BMS devre kartları ucuzdur (yaklaşık $5).
Bağlantı kurmak için, sadece BMS'den gelen kabloları ilk ve son hücrenin pozitif ve negatif terminallerine bağlarsınız.
Çoğu BMS ayrıca küçük bir dengeleme kablosu da gerektirir. Ama PCB üzerindeki kablolama diyagramı kurulumu kolaylaştırır.
Şimdi, yeni DIY pil şaheserinizin nasıl kullanılacağı ve bakımını yapacağımızı gözden geçirelim.
Şarj ve Deşarj İpuçları
Doğru şarj ve deşarj, kendi yapım 12V paketinizden en uzun ömürü almak için anahtardır.
İşte bazı hızlı kullanım kılavuzları:
- Li-ion şarj cihazı kullanın – CC/CV, döngü sayısını maksimize etmek için idealdir. Güneş enerjisi kontrolörü ile şarj da çalışır.
- Çok düşük deşarj etmeyin – Hücre başına en az 2.5V üzerinde kalın. BMS muhtemelen bu noktada keser.
- Hücre voltajlarını izleyin – Her zaman hücre voltajlarını kontrol ederek düzgün dengeleme yapıldığından emin olun.
- Serin tutun – Isı, pilleri öldürür! Sıkıca kapatmayın ve yüksek akım çekimlerinden kaçının.
İşte karşınızda — kendi 12v lityum-iyon güç kaynağınızı oluşturmak için bilmeniz gereken her şey!
Bazı özel parçalar ve elektronik bilgisi gerektirse de, özel bir batarya paketi hazırlamak göründüğü kadar zor değildir.
Çaba, ultra hafif, yüksek performanslı, yeniden kullanılabilir 12v batarya ile sonuçlanmaya değerdir.
Şimdi sıra sizde. Birkaç 18650 hücre alın ve yapmaya başlayın!