Akü Kontrol Modülü Nedir? Eksiksiz Bir Kılavuz
Batarya Kontrol Modülü nedir?
Bir batarya kontrol modülü, genellikle BCM olarak adlandırılır, elektrikli araçlar, enerji depolama sistemleri, tüketici elektroniği ve daha fazlasında kullanılan batarya paketlerinde bulunan batarya yönetim sistemlerinin (BMS) temel bir bileşenidir. Bu bütünsel cihaz, güvenli, güvenilir ve optimal çalışmayı sağlamak için bireysel batarya hücrelerinin performansını aktif olarak izler ve düzenler.
Bu makalede, profesyonel olarak lityum pil paketleri üreticisi, batarya kontrol modülü hakkında her şeyi paylaşacağım.

Bir Batarya Kontrol Modülü Ne Yapar?
Bir batarya kontrol modülünün temel sorumlulukları şunları içerir:
Batarya Hücresi Parametrelerini İzleme
BCM'ler, sensör girişleri ve ölçüm devreleri aracılığıyla hücre voltajı, akım ve sıcaklık gibi anahtar parametreleri sürekli takip eder. Her batarya hücresinden gerçek zamanlı veri toplayarak, BCM hücre ve paket seviyesinde şarj durumu (SOC) ve sağlık durumu (SOH) belirleyebilir.
Anormal Koşullara Karşı Koruma
Hücre voltajları veya sıcaklıklar önceden ayarlanmış güvenlik sınırlarını aşarsa, BCM koruyucu önlemler tetikleyebilir; örneğin, paketi devre dışı bırakmak veya şarj/deşarj akımını sınırlamak. Bu önlemler, batarya hücrelerini hasardan korurken genel güvenliği ve ömrü artırır.
Hücreler Arasında Şarj Dengesini Sağlama
Üretim toleransları veya düzensiz yaşlanma nedeniyle, bir paketteki hücreler zamanla kapasite ve iç direnç farkları geliştirebilir. BCM'ler, aktif hücre dengeleme yoluyla bu sorunu giderir ve tüm hücrelerde eşit SOC sağlar.
Paket İletişimlerini Kolaylaştırma
BCM, batarya hücreleri ile araç kontrol üniteleri veya batarya yönetim sistemleri arasında aracı görevi görür. CAN bus gibi iletişim protokolleri kullanarak, hayati verileri ve teşhis bilgilerini alt sistemler arasında iletir.
Gelişmiş Kontrol Algoritmalarını Uygulama
Modern BCM tasarımları, SOC tahmini, termal yönetim, ömür prognostikleri ve şarj optimizasyonu ile ilgili sofistike kontrol algoritmaları ve hesaplama modellerini uygulayabilen güçlü mikrodenetleyiciler içerir.
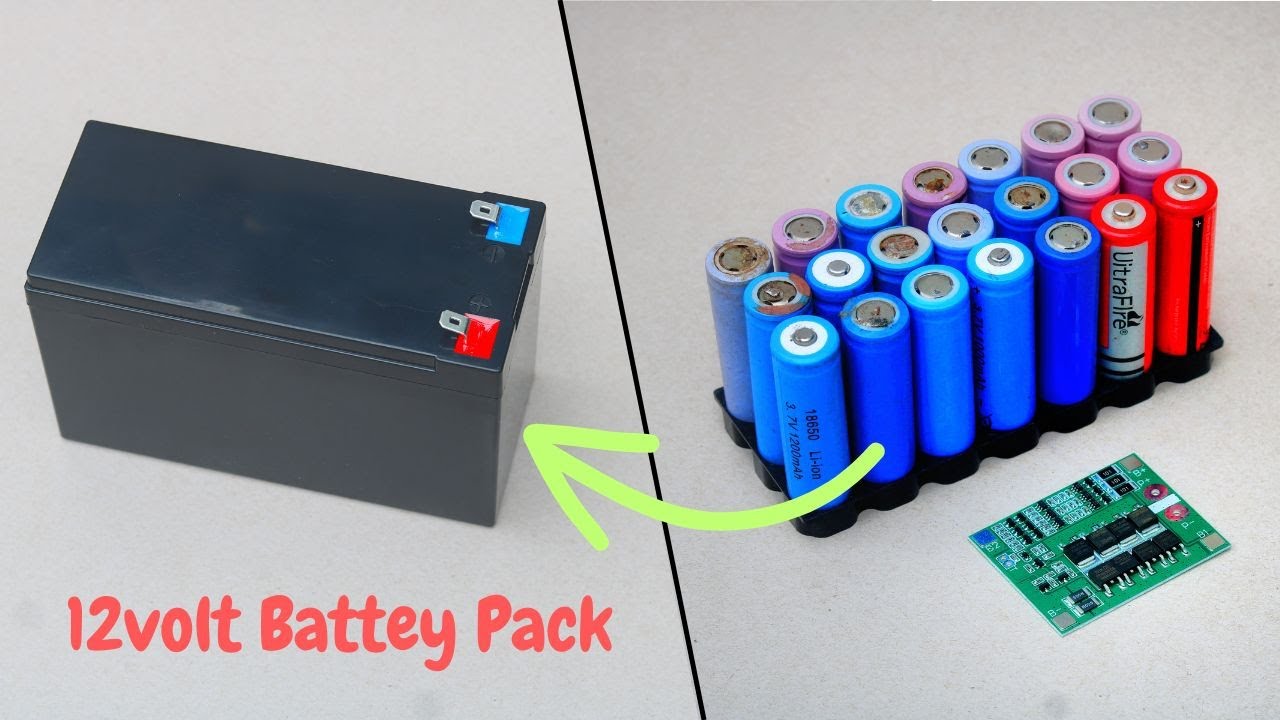
Bir Batarya Kontrol Modülünün Temel Bileşenleri
Batarya kontrol modülleri, belirli batarya kimyası ve paket yapılandırmalarının izleme, kontrol ve koruma ihtiyaçlarına uygun donanım ve yazılım unsurlarını içerir.
Algılama Devreleri
Gerilim, akım ve sıcaklık sensörleri, BCM'ye kritik ölçüm girdileri sağlar. Hassas sensör verileri, doğru hücre izleme sağlar ve şarj, yük dengeleme ve koruyucu işlemlerle ilgili kontrol kararlarını bilgilendirir.
Sinyal Şekillendirme
Sensör sinyalleri, BCM’nin analog-dijital dönüştürücülerine ve mikrodenetleyicisine beslenmeden önce filtreleme veya amplifikasyon gibi ayarlamalar gerektirebilir. Özel entegre devreler (IC'ler), sensör uyarımı, ofset ayarı ve anti-aliasing gibi görevleri yerine getirir.
Mikrodenetleyici Birimi
MCU, BCM’nin temel işlem birimini oluşturur. BMS algoritmalarını çalıştırır ve ölçüm verilerini dengeleme devreleri, kontaktörler, termal sistemler ve diğer paket alt bileşenleri için kontrol komutlarına çevirir.
İletişim Arayüzleri
LIN, CAN ve Ethernet gibi ağ arayüzleri, BCM ile batarya, inverter veya araç kontrol üniteleri gibi harici denetleyiciler arasında iletişimi kolaylaştırır. İletişim protokolleri, hayati veri paylaşımı ve teşhis yetenekleri sağlar.
Dengeleme Devreleri
BCM içindeki aktif veya pasif dengeleme donanımı, hücrelerin eşit şarj olmasını sağlar. MCU, gerektiğinde hücreler etrafında akım yönlendirmek veya fazla enerjiyi dirençler aracılığıyla dağıtmak için dengeleme devrelerini seçici olarak aktive eder.
Güç Kaynakları
BCM'ler, sensörler, IC'ler ve MCU'ları beslemek için stabil güç kaynakları sağlamak amacıyla düzenlenmiş güç kaynağı devrelerine sahiptir. Verimliliği maksimize etmek için hem doğrusal hem de anahtarlamalı regülatörler kullanılabilir.
Teknik Özellikler
Batarya kontrol modüllerinin aşağıdaki temel teknik özellikleri vardır:
- Besleme gerilimi aralığı – Genellikle 9V ile 60V DC uyumlu, yaygın batarya paketi voltajlarıyla
- Sensör girişleri – Gerilim (±50mV hassasiyet), akım ve sıcaklık ölçüm kanalları
- İletişim protokolleri – CAN 2.0B, LIN 2.0/2.1, RS485, Ethernet
- Dengeleme akımı – Hücre başına 100mA'den 5A'ye kadar BCM tasarımına bağlı olarak
- Çevresel derecelendirme – IP6K7/IP6K9K su ve toz direnci, AEC-Q100 stres testleri
- Çalışma sıcaklığı – -40°C ile 85°C arası aralık
Farklı Uygulamalarda Batarya Kontrol Modülünün Rolü
Elektrikli Araçlar
BCM'ler, hücre sağlığı parametrelerini izleyerek, kullanılabilir menzili hesaplayarak, termal yönetimi kolaylaştırarak ve maliyetli batarya paketini koruyarak batarya elektrikli araçlarda vazgeçilmez bir rol oynar.
Enerji Depolama Sistemleri
Büyük ölçekli yenilenebilir enerji depolama sistemlerinde, BCM'ler yüzlerce batarya modülünün çalışmasını koordine eder. Şarj/deşarjı optimize ederek hizmet ömrünü uzatır ve kötüye kullanım koşullarını önler.
Taşınabilir Elektronikler
BCM'ler, dizüstü bilgisayarlar, güç araçları, elektrikli bisikletler ve diğer taşınabilir elektronik cihazlar için kullanılan batarya paketlerinde bulunur. Burada esas olarak hücre izleme, şarj dengeleme ve güvenlik mekanizmalarını uygulamaya odaklanırlar.
Ana Faydalar
Uygun şekilde tasarlanmış batarya kontrol modüllerinin kullanımı aşağıdaki avantajları sağlar:
Gelişmiş Güvenlik ve Kötüye Kullanım Dayanıklılığı
BCM'ler, termal kaçak gibi güvenlik risklerini azaltırken, titreşimlere, mekanik şoklara ve kötüye kullanım elektrik yüklerine karşı dayanıklılığı artırır. Regülatörlerin kötüye kullanım dayanıklılığı testlerini geçmek için hayati öneme sahiptirler.
Hizmet Ömrünün Artması
Hücreleri aktif olarak dengeleyerek ve aşırı şarj, aşırı deşarj veya aşırı ısınmadan kaynaklanan hasarı önleyerek, BCM'ler batarya paketlerinin kullanılabilir hizmet ömrünü önemli ölçüde uzatır.
Sistem Verimliliğinin Artırılması
BCM verileri, dış kontrolörlerin şarj ve deşarj süreçlerini optimize ederek verimlilik ve batarya paketinin kullanımını maksimize etmelerine yardımcı olur.
Garanti Taleplerinin Azalması
Kapsamlı hücre izleme, daha iyi sağlık durumu tahminleri ve erken arıza tespiti sağlar, böylece erken batarya arızalarını azaltır.
Sistem Entegrasyonunun Basitleştirilmesi
Standartlaştırılmış iletişim arayüzleri, BCM'lerin diğer alt sistemlerle hayati verileri sorunsuz bir şekilde değiş tokuş etmesine olanak tanır ve tak-çıkar entegrasyonunu kolaylaştırır.
Bir Batarya Kontrol Modülü Testi Nasıl Yapılır?
Sıkı testler, BCM tasarımlarının performansını, güvenliğini ve güvenilirliğini doğrular:
İşlevsellik Testi
Simüle edilmiş çalışma koşulları altında doğru izleme, dengeleme, kontrol yetenekleri ve iletişim arayüzlerinin sağlandığını garanti eder.
Çevresel Test
Kapanışın, bağlantıların ve iç yapıların darbe, titreşim, nem ve geniş sıcaklık dalgalanmalarına maruz kalırken dayanıklılığını doğrular.
Koruma Testi
Aşırı gerilim, aşırı akım ve termal kaçak senaryolarında güvenlik mekanizmalarının aktif hale geldiğini doğrular.
Yaşam Döngüsü Testi
Yeniden şarj/deşarj profili ile gerçekçi görev döngülerini taklit ederek dayanıklılığı onaylar.
Uyumluluk Testi
Düzenleyici kurumlar tarafından zorunlu kılınan elektriksel ve çevresel güvenlik standartlarına uyumu doğrular:
Sadece sıkı niteliklendirme ve sertifikasyon protokollerinden geçen tasarımlar, ticari batarya tabanlı ürünlerde kullanılır.
Sonuç
Sonuç olarak, batarya kontrol modülleri, ulaşım, yenilenebilir enerji ve tüketici elektroniği uygulamalarında modern batarya yönetim sistemlerinde vazgeçilmez bir konumda yer alır. Batarya performansını optimize eder, güvenlik ve ömrü artırır, sistem karmaşıklığını azaltır ve genel kalite ile kullanıcı deneyimini iyileştirir. Bataryalar taşınabilir enerji depolama çözümleri olarak yaygınlaştıkça, gelişmiş BCM teknolojileri, daha yüksek performans standartları, kötüye kullanıma dayanıklılık ve tak-çıkar entegrasyonu ile yaygın kullanımın sağlanmasında kritik rol oynamaya devam edecektir.