How to Make a 12v 18650 Battery Pack from Scratch
Making your own custom 12v 18650 lithium-ion battery pack may sound intimidating. But I’m going to walk you through the entire process, step-by-step.
Whether you want to create a compact 12v battery to power your latest DIY project or need to replace an old SLA battery, building your own 18650 pack is surprisingly straightforward.
In this guide, you’ll learn things like:
- How to calculate the number of 18650 cells needed
- Choosing the right 18650 cells
- Battery holder options
- Wiring configurations
- Adding a BMS (battery management system)
- Charging and discharging your new battery
And a whole lot more.
So strap on your safety goggles and let’s get to work!

Why Make Your Own 12v Battery Pack?
Before we dive in, you may be wondering — why go through the trouble of piecing together your own 12v lithium-ion battery?
Here are the main reasons DIYers build their own packs:
Save Money
Pre-built 12v lithium batteries can cost anywhere from $100 to $300+.
By sourcing individual 18650 cells and a basic holder, you can craft a custom battery for a fraction of the cost.
Custom Specs
When you buy an off-the-shelf 12v SLA battery, it likely won’t match your exact voltage and capacity needs.
But with a DIY 18650 pack, you get to dictate the voltage, capacity, discharge rate and more.
Compact Size & Weight
A 12v 5Ah 18650 battery pack takes up far less space than an equivalent lead-acid brick. And it’s many times lighter.
Perfect when size and weight are a concern (like for portable battery boxes, drones, robotics projects, etc).
Reusability
Once an SLA battery dies, that’s usually the end of the road. But with a custom 18650 pack, you can replace worn-out cells down the line and keep on going.
Ok, with the benefits covered, let’s start prepping for our battery build!
How to Make a 12v 18650 Battery Pack?
Step 1: Calculate Number of Cells For 12v
The foundation of any DIY lithium-ion battery is the individual 18650 cells.
So before we worry about wiring configurations or battery protection, we first need to know how many cells are required for our 12v pack.
Here is the simple formula:
Total voltage ÷ Cell voltage = Number of cells in series
Now let’s plug in the numbers.
The standard voltage range of an 18650 cell is:
- 3.6v (Nominal)
- 4.2v (Max charge)
- 2.5v (Discharge cutoff)
For a 12v battery pack, we’ll use the nominal 3.6v figure for our calculation:
12v ÷ 3.6v = 3.33
Rounding up gives us 4 cells in series.
However, we can squeeze a bit more capacity out of our battery by running 3 cells in series (for approx 10.8v). This gives us some cushion before the battery management system cuts off power completely.
So the verdict is…3 lithium-ion cells wired in series gives us the voltage we need.
Now time to source our 18650s!
Step 2: Choosing Quality 18650 Cells
Not all lithium-ion cells are created equal.
The 18650 battery market is flooded with ultra-cheap cells that seem like a good bargain. But trust me, these low-quality cells will cause you nothing but headaches.
Instead, you want high-performing cells from top brands like:
Samsung
Samsung makes some of the best lithium-ion cells on the planet. Their bright green 18650s are my #1 pick.
The Samsung INR18650 35E is a very popular choice that balances performance and cost.
LG
Known for powerful vaping batteries, LG’s 18650 lineup doesn’t disappoint.
The LG MH1 offers a solid 3,000 mAh capacity.
Sony
You can always count on Sony for reliable tech. And their VTC 18650 batteries deliver.
I’m a fan of the Sony VTC6 cell — with its high 30 amp limit and 3,000 mAh rating.
Stick with one of those major brands and you’ll be off to a great start.
Now let’s move onto the next step…
Step 3: Get an 18650 Battery Holder
Once you have your 18650 cells, you need something to physically connect them.
You have two options here:
Spot Welding Nickel Strips
Spot welding involves using a specialized welding machine to fuse thin nickel strips onto the positive and negative terminals of an 18650 cell.
This creates an ultra-secure connection. But the welding gear costs $200+.
Using a Plastic Battery Holder
For most DIYers, a plastic 18650 battery holder is the way to go.
These holders slot multiple cells together and have spring-loaded ends to keep tension on the cell. Two wires with a JST connector then plug into the terminals of the first and last cells.
I like these holders because they’re idiot-proof. No advanced soldering skills needed!
You can grab quality 18650 holders for under $10 on Amazon or sites like Banggood. Just ensure your holder matches the number of cells needed (in our case, 3 cells in series).
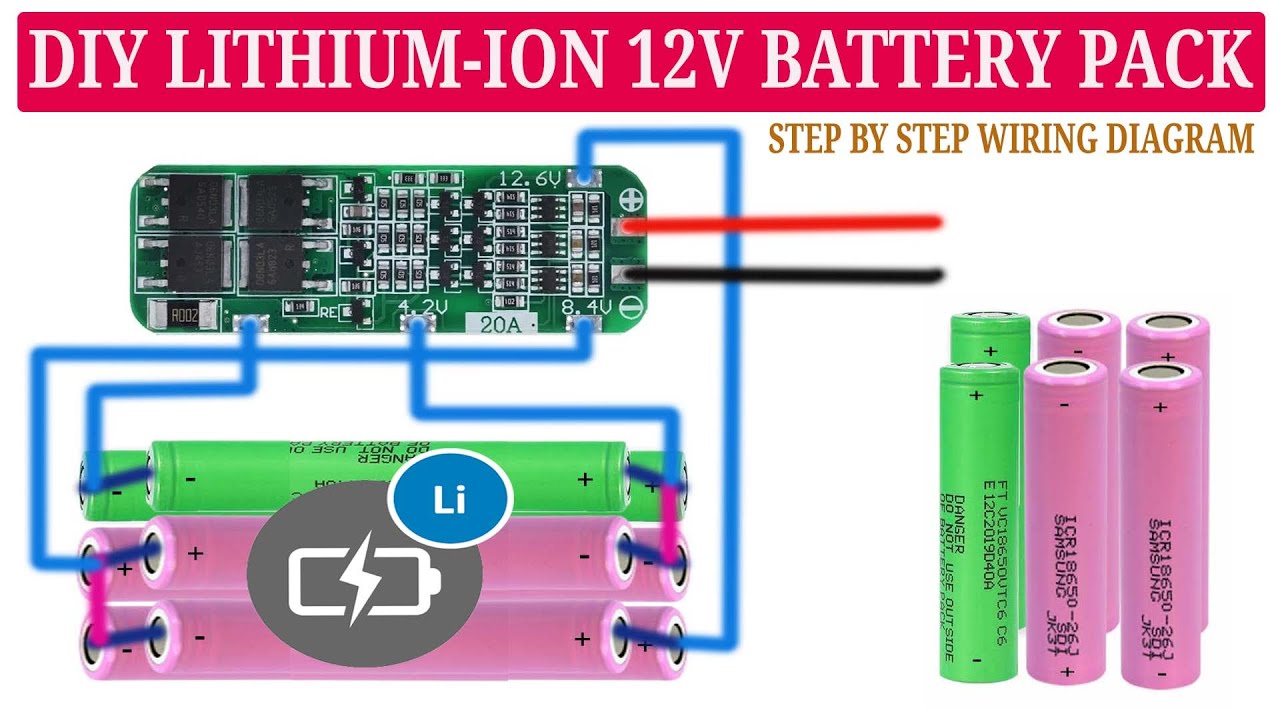
Step 4: Wire Cells in Series
To achieve 12v (or close to it), the cells must be connected end-to-end in a series configuration.
This chains them together so the voltage adds up.
Here is how to arrange the cells:
Cell 1 positive terminal faces up and negative terminal faces down.
Cell 2 positive terminal faces down and negative terminal faces up.
Cell 3 positive terminal faces up and negative terminal faces down.
Once slotted into the plastic holder, the cells automatically connect end-to-end.
Those spring terminals ensure a snug fit.
Then you simply attach the red and black holder wires to your project and you now have ~12v DC power!
But before you get charging, there’s an important safety step…
Step 5: Install a BMS
A battery management system (BMS) is crucial when building lithium-ion battery packs from bare 18650 cells.
Here are a few critical jobs a BMS performs:
- Prevents over-discharging cells
- Stops overcharging
- Balances all cells to the same voltage
- Cuts off if cell temperature gets too high
Without a BMS in place, lithium-ion batteries can be extremely dangerous. They can overheat, catch fire or even explode.
No BMS means no safety. I cannot stress this enough.
Thankfully, small BMS circuit boards designed for 3-4 cell packs are inexpensive (around $5).
To connect it, you simply attach wiring from the BMS to the positive and negative terminals of the first and last cell.
Most BMS will also need a small balance lead attached. But the wiring diagram on the PCB makes installation straightforward.
Now let’s go over how to use and care for your new DIY battery masterpiece.
Charging & Discharging Tips
Charging and discharging properly is key to getting the most life from your homebrew 12v pack.
Here are some quick usage guidelines:
- Use a Li-ion charger – CC/CV is ideal to maximize cycle count. Charging via solar controller also works.
- Don’t discharge too low – Stay above 2.5v per cell minimum. The BMS will likely cut-off around this point anyway.
- Monitor cell voltages – Occasionally check each cell voltage to confirm they’re balancing properly.
- Keep cool – Heat kills batteries! Don’t enclose tightly and avoid high current draws.
And there you have it — everything you need to know to create your very own 12v lithium-ion powerhouse!
While it takes some specialized parts and electronics knowledge, piecing together a custom battery pack isn’t as hard as it seems.
The effort is well worth it to end up with an ultra-light, high-performance, reusable 12v battery.
Now it’s your turn. Grab some 18650 cells and start building!


