So you want to learn how to make power bank with 18650 battery?
You’re in the right place.
Maybe you’ve got some old laptop batteries lying around. Or you’re tired of paying $50+ for decent power banks that barely last a year.
Here’s the thing:
Building your own 18650 power bank isn’t rocket science. In fact, with the right components and a bit of patience, you can create a custom power bank that’s more powerful (and way cooler) than anything you’ll find on Amazon.
I’ve built dozens of these over the years. And in this guide, as a professional 18650 battery pack manufacturer, I’ll show you exactly how to make power bank with 18650 battery step-by-step.
Let’s dive in.
What You’ll Need (The Complete Parts List)
First things first:
You can’t build a power bank without the right components.
Here’s exactly what you’ll need:
The Core Components
18650 Lithium-Ion Cells: These are your power source. You’ll want at least 2 cells (though I recommend 4 for better capacity). Look for cells with 2500-3500mAh capacity.
Charging Board/Module: This is the brain of your DIY power bank. I recommend boards with:
- BMS (Battery Management System) for safety
- Built-in boost converter (steps up 3.7V to 5V USB output)
- TP4056 chip for reliable charging
Wires: 22 AWG silicone wire works great. Don’t go thinner – you need wire that can handle the current.
Case/Enclosure: You can 3D print one, buy a pre-made case, or even repurpose an old container.
Tools You’ll Need
- Soldering iron and solder
- Wire strippers
- Multimeter (for testing)
- Hot glue gun (optional but helpful)
- Spot welder (ideal) or battery holders (easier alternative)
Pro Tip: If you’re just starting out, use battery holders instead of spot welding. It’s safer and you can swap cells later.
Where to Find Quality 18650 Batteries
This is SUPER important:
The battery is the most expensive part of your power bank. And there are tons of fake 18650s out there.
Here’s where to find legitimate cells:
Option 1: Salvage From Old Laptop Batteries
Dead laptop batteries are a goldmine.
Even “dead” laptop battery packs usually have 2-3 working cells inside. I’ve salvaged hundreds of perfectly good 18650s this way.
Just be careful when opening the pack. Use proper tools and wear safety glasses.
Option 2: Buy New From Reputable Sources
If you want brand new cells, stick to trusted brands:
- Samsung
- LG
- Panasonic
- Sony
Avoid suspiciously cheap cells on eBay or random websites. If a 3500mAh cell costs $2, it’s fake.
I typically pay $5-8 per genuine high-capacity cell.
How to Make Power Bank With 18650 Battery: Step-By-Step
Now for the fun part.
Let’s build this thing.
Step 1: Test Your Batteries
Before doing anything else:
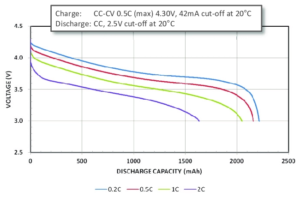
Check each cell’s voltage with a multimeter. They should read between 2.5V and 4.2V.
If any cell reads below 2.5V, don’t use it. It’s potentially dangerous.
Also, if you’re using multiple cells, make sure they’re all within 0.1V of each other before connecting them.
Step 2: Connect Batteries in Parallel
For a basic power bank, wire your cells in parallel.
This means:
- All positive terminals connect together
- All negative terminals connect together
This keeps the voltage at 3.7V while multiplying the capacity.
For example:
- 2 x 2500mAh cells = 5000mAh total
- 4 x 2500mAh cells = 10,000mAh total
Use nickel strips and a spot welder for permanent connections. Or use battery holders for a beginner-friendly approach.
Step 3: Wire the Charging Module
This is where most people mess up.
Your charging board will have terminals marked:
- B+ (battery positive)
- B- (battery negative)
- OUT+ (USB output positive)
- OUT- (USB output negative)
Connect your battery pack’s positive to B+ and negative to B-.
The USB output connections are usually pre-wired to the USB ports on the board.
Step 4: Test Before Final Assembly
CRITICAL step:
Before putting everything in a case, test your connections.
Use a multimeter to verify:
- Battery voltage at the B+ and B- terminals
- 5V output at the USB port
- No shorts between positive and negative
Plug in a USB cable and check that the charge indicator lights work.
Step 5: Secure Everything in the Case
Once everything works:
- Use hot glue to secure the circuit board in your case
- Make sure USB ports line up with the case openings
- Secure the batteries (they shouldn’t rattle around)
- Double-check no bare wires are touching
I like to wrap the entire battery pack in electrical tape for extra insulation.
Safety Considerations (Don’t Skip This Part)
Look:
18650 batteries pack serious power. Treat them with respect.
Here are the non-negotiable safety rules:
Never short circuit the batteries. A short can cause fires or explosions.
Use protected cells when possible. These have built-in safety circuits.
Don’t mix old and new cells. This can cause uneven discharge and damage.
Store in a cool, dry place. Heat is the enemy of lithium batteries.
Use a BMS (Battery Management System). This prevents overcharge, over-discharge, and shorts.
I’ve seen people skip the BMS to save $5. Don’t be that person.
Boost vs Buck: Which Design Should You Choose?
Here’s something most DIY guides don’t tell you:
There are two ways to build a power bank.
Boost Configuration (Easier)
This uses a single cell or parallel cells (3.7V) and boosts the voltage to 5V.
Pros:
- Simpler to build
- Fewer components needed
- Cheaper
Cons:
- Less efficient at low battery levels
- May struggle to maintain 5V output when battery is low
- Slower charging speeds
Buck Configuration (Better Performance)
This uses cells in series (like 3S for 11.1V) and steps DOWN to 5V.
Pros:
- More stable 5V output
- Works efficiently even with low battery
- Can charge your power bank faster
Cons:
- More complex to build
- Requires a proper BMS for multiple series cells
- Costs more
For your first build? Go with boost configuration. It’s way more forgiving.
Calculating Your Power Bank’s Capacity
Want to know how long your power bank will last?
Here’s the math:
Capacity (mAh) = Number of cells × Cell capacity
But here’s the catch:
You need to account for conversion losses. The boost converter isn’t 100% efficient.
Real-world capacity = Battery capacity × 0.85
So a 10,000mAh battery pack gives you about 8,500mAh of usable power.
For reference:
- iPhone 13: 3,227mAh battery
- Samsung S21: 4,000mAh battery
- iPad Air: 7,606mAh battery
Your 10,000mAh power bank can charge an iPhone about 2.5 times.
Common Mistakes to Avoid
I’ve seen people make these mistakes over and over:
Mistake #1: Using thin wires
Thin wires can’t handle the current. They’ll heat up and potentially melt. Stick with 22 AWG or thicker.
Mistake #2: Skipping voltage matching
Connecting cells with different voltages causes massive current flow between them. Always match voltages first.
Mistake #3: Overheating while soldering
Too much heat damages cells. Use flux and work quickly. Better yet, use battery holders or spot welding.
Mistake #4: No ventilation in the case
Batteries need some airflow. Don’t seal your case completely airtight.
Advanced Modifications You Can Try
Once you’ve built your first power bank, you might want to level up.
Here are some cool modifications:
Add a Digital Display
LCD voltage displays show remaining capacity. They’re cheap and easy to wire in.
Multiple Output Ports
Add extra USB modules in parallel for charging multiple devices.
Solar Charging
Integrate a small solar panel for emergency charging. Great for camping.
Fast Charging Support
Use modules that support Quick Charge or USB-C Power Delivery.
Built-in LED Flashlight
Super handy for emergencies. Just add an LED and a small switch.
Testing and Troubleshooting
Built your power bank but something’s not working?
Here’s how to troubleshoot:
Problem: No USB output
- Check battery voltage (should be 3V-4.2V)
- Verify connections to the charging board
- Test the boost converter separately
Problem: Won’t charge devices
- USB port might be damaged
- Output current too low (check board specifications)
- Batteries might be depleted
Problem: Gets hot while charging
- Normal to be slightly warm
- If very hot, check for shorts
- Charging current might be too high
Problem: Short battery life
- Test actual cell capacity
- Check for parasitic drain
- Boost converter might be inefficient
Cost Comparison: DIY vs Store-Bought
Let’s talk money.
Here’s what I typically spend on a 10,000mAh DIY power bank:
- 4 x 18650 cells (used): $8
- Charging board: $5
- Case: $3
- Wires and misc: $2
Total: About $18
A comparable commercial power bank? $30-50.
Plus, your DIY version is:
- Repairable
- Upgradeable
- Customizable
- Actually fun to build
The savings add up if you build multiple units.
Final Thoughts
Building your own power bank with 18650 batteries isn’t just about saving money.
It’s about understanding the technology you use every day. Plus, there’s something satisfying about charging your phone with something you built yourself.
Start simple. Use quality components. Follow safety guidelines.
Your first build might not be perfect. That’s OK. Mine wasn’t either.
But once you get the hang of it? You’ll never buy another overpriced power bank again.
The best part:
When your friends ask where you got that awesome custom power bank, you get to say “I made it myself.”
Pretty cool, right?
Now that you know how to make power bank with 18650 battery, it’s time to start building. Grab those components and get started. Your future self (with a fully charged phone) will thank you.