Looking to salvage some perfectly good 18650 cells from an old battery pack?
You’ve come to the right place.
Here’s the deal: 18650 battery packs are everywhere. Laptops, power tools, electric bikes — you name it. And when these packs “die,” it’s usually just a few bad cells bringing down the whole team.
Learning how to disassemble 18650 battery pack components safely can save you serious cash and help the environment too. But let’s be real — these aren’t AA batteries we’re dealing with. One wrong move and you could be dealing with sparks, smoke, or worse.
In this comprehensive guide, as a professional 18650 battery pack manufacturer, I’ll walk you through the exact process I use to break down these battery packs safely. No fluff, just actionable steps you can follow today.
Let’s dive in.
Why Salvage 18650 Cells?
Before we get into the nitty-gritty, let’s talk about why you’d want to do this in the first place.
Here’s why salvaging 18650 cells makes sense:
-
Cost savings: Brand new 18650 cells can cost $5-10 each. Why buy new when perfectly good ones are sitting in that “dead” laptop battery?
-
Environmental impact: Keeping lithium-ion batteries out of landfills is a big win for our planet.
-
DIY projects: Building your own power bank, flashlight, or even an e-bike battery becomes much more affordable.
-
It’s fun: If you’re like me, there’s something satisfying about giving new life to something that was headed for the trash.
In fact, when I built my first DIY power bank in early 2025, I used salvaged cells exclusively. The result? A high-capacity power bank that cost me just $15 in additional parts.
Safety First: Critical Precautions
I can’t stress this enough:
Lithium-ion batteries can be dangerous if mishandled.
In the search data, there was someone who experienced sparks and smoke during disassembly. That’s exactly what we want to avoid.
Here are the non-negotiable safety measures:
-
Work in a well-ventilated area away from flammable materials
-
Remove all jewelry (rings, watches, bracelets)
-
Wear safety glasses and insulated gloves
-
Have a fire extinguisher nearby (specifically a Class D if possible)
-
Work on a non-conductive surface
-
Never short circuit the cells
-
Keep a bucket of sand nearby (not water!) for emergency containment
Remember: Water and lithium batteries don’t mix. If there’s a fire, use sand to smother it.
Essential Tools for Battery Pack Disassembly
Having the right tools makes all the difference between a smooth disassembly and a frustrating (or dangerous) experience.
Here’s what you’ll need:
-
Flush cut pliers – These are crucial for cutting nickel strips without causing shorts
-
Insulated needle-nose pliers – For gripping and removing strips
-
Silicone gloves – For protection against sharp edges and electrical shorts
-
Kapton tape – Essential for insulating exposed connections during disassembly
-
Plastic spudger or pry tool – For non-conductive separation of cells
-
Multimeter – To check cell voltages
-
Small container – For organizing and storing removed cells
-
Safety glasses – Protect your eyes from sparks
-
Heat-resistant work surface – A silicone mat works well
Pro Tip: Wrap the handles of your metal tools with electrical tape for extra insulation, leaving only the tips exposed. This significantly reduces the risk of accidental shorts.
Step-by-Step: How to Disassemble 18650 Battery Pack
Now, let’s break down this process into manageable steps:
Step 1: Preparation and Discharge
First things first, you need to prepare the battery pack:
-
Check the overall voltage of the pack with your multimeter
-
If the voltage is high (>3.7V per cell), consider partially discharging the pack with a resistive load
-
Place your battery on a non-conductive, heat-resistant work surface
-
Have all your tools and safety equipment ready
Remember: A partially discharged battery (around 3.2-3.4V per cell) is safer to work with than a fully charged one.
Step 2: Remove External Casing
Most battery packs have some form of outer casing that needs to be removed:
-
Look for screws, tabs, or adhesive points holding the case together
-
Use appropriate tools to open the case without damaging internal components
-
Take photos as you go to remember how everything fits together
-
Set aside any circuit boards or BMS (Battery Management System) carefully
When I disassembled my first laptop battery pack, I was surprised by how much adhesive they used. Take your time here – rushing can damage cells or cause shorts.
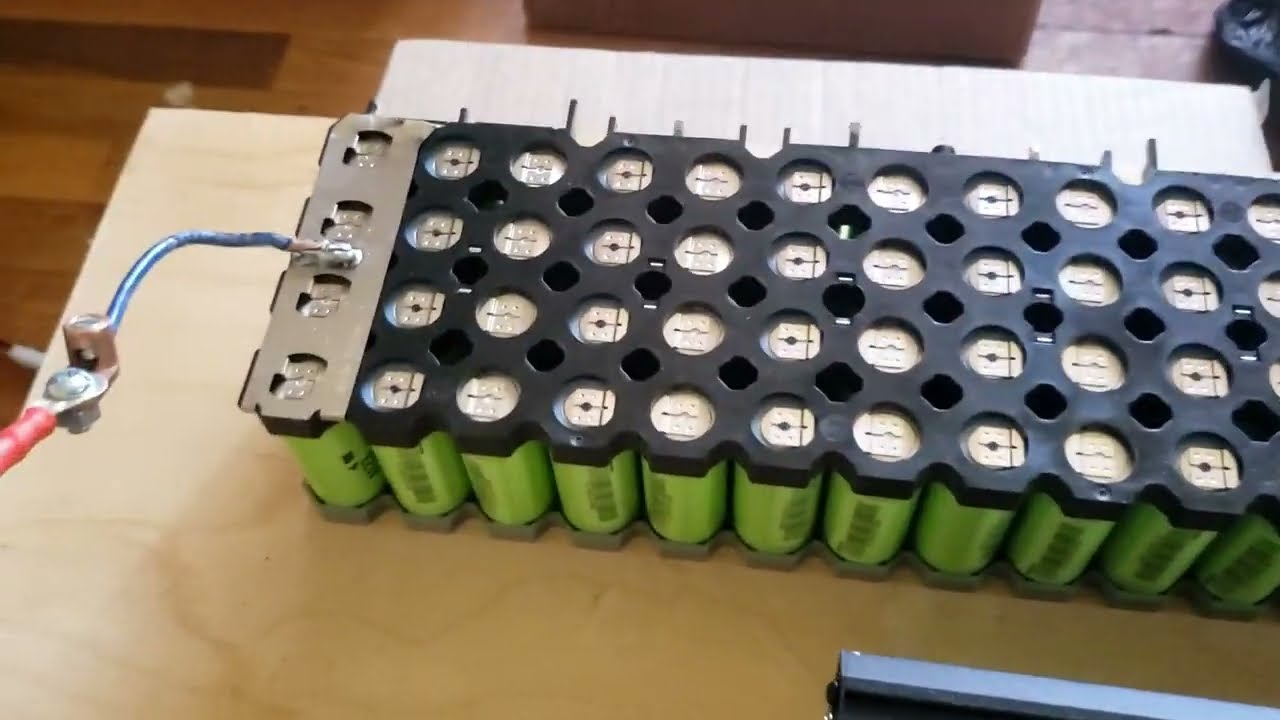
Step 3: Identify the Pack Configuration
Before cutting anything, understand how the pack is configured:
-
Note how many cells are in series (S) and parallel (P)
-
Identify positive and negative terminals
-
Look for the BMS connection points
-
Observe how the nickel strips are arranged
Typical configurations include 4S2P (4 in series, 2 in parallel) for laptop batteries or 13S for e-bike batteries.
Step 4: Disconnect the BMS
The Battery Management System (BMS) is the circuit board that monitors and protects the battery:
-
Identify all connection points between the BMS and cells
-
Use insulated tools to disconnect or cut these connections
-
Apply Kapton tape to any exposed wires or connection points
-
Set the BMS aside (you might want to reuse it later)
Important: Never cut multiple wires simultaneously – this can create a short circuit.
Step 5: Isolate Cell Groups
Now comes the critical part:
-
Use Kapton tape to cover areas you’re not currently working on
-
Start by cutting the nickel strips between cell groups using flush cut pliers
-
Always cut perpendicular to the strip, never parallel to cell surfaces
-
Work from one end of the pack, systematically separating groups of cells
From my experience, cutting the pack into smaller isolated groups first makes the whole process much safer and more manageable.
Step 6: Remove Nickel Strips from Individual Cells
This is where precision matters:
-
Start with the negative terminals (usually the flat end of the cell)
-
Use needle-nose pliers to gently roll and lift the nickel strips away from the cell
-
Pull up and away from the cell, never across multiple cells
-
Be extremely cautious when working with positive terminals – shoulder shorts are a real danger
As the search results mentioned, it’s important to understand that these nickel strips are spot-welded on. They’re designed to stay put, so be patient and use controlled force.
Step 7: Final Cell Separation and Cleaning
Once the nickel strips are removed:
-
Gently separate each cell from any remaining adhesive
-
Use flush cutters to remove any small bits of nickel still attached to cell terminals
-
Inspect each cell for damage (dents, punctures, leaking)
-
Clean the terminals with a non-conductive tool if needed
Testing Your Salvaged 18650 Cells
Not all salvaged cells are worth keeping. Here’s how I test mine:
-
Visual inspection: Discard any cells with visible damage
-
Voltage check: Each cell should read between 2.5V and 4.2V
-
Rest test: After measuring voltage, let cells sit for 24-48 hours and check voltage again
-
Capacity testing: Use a battery analyzer to measure actual capacity
-
Internal resistance: Good cells typically have 50-80 mΩ internal resistance
Pro Tip: Label each cell with its measured capacity using a marker or sticker. This will make matching cells much easier when you’re ready to build something new.
When I tested cells from an old laptop battery, I found that 6 out of 8 cells were still perfectly usable, with capacities above 2000mAh. That’s a great success rate!
Common Mistakes to Avoid
Over the years, I’ve made (and seen) plenty of mistakes when disassembling battery packs. Learn from them:
-
Don’t use metal tools without insulation – This is asking for shorts
-
Never cut through multiple layers at once – Cut one connection at a time
-
Don’t rush the process – Battery disassembly requires patience
-
Never work on fully charged batteries – Partially discharged is safer
-
Don’t stack loose cells – Keep them separate until proper storage
-
Avoid working when tired – This is precision work that requires focus
What to Do With Your Salvaged Cells
So you’ve successfully disassembled your battery pack and tested the cells. Now what?
Here are some great uses for those salvaged 18650s:
-
Build a DIY power bank – Perfect for camping or emergencies
-
Make a custom flashlight – Many high-end flashlights use 18650 cells
-
Create a new battery pack – For tools, e-bikes, or other devices
-
Solar storage – Pair with small solar panels for off-grid power
-
Properly recycle cells that didn’t pass testing – Most electronics stores accept lithium batteries for recycling
Remember to group cells with similar capacities and internal resistance when building new packs.
Is It Worth All the Effort?
You might be wondering if learning how to disassemble 18650 battery pack components is worth the time and effort.
Here’s my take:
If you need just a few cells for a small project, buying new high-quality cells might be easier and safer. But if you:
-
Enjoy DIY electronics
-
Want to save money on larger projects
-
Care about reducing e-waste
-
Enjoy learning new skills
…then absolutely, it’s worth it.
When I built my 48V e-bike battery, I saved over $200 by using carefully tested salvaged cells. The battery has been performing flawlessly for months.
Conclusion
Learning how to disassemble 18650 battery pack units safely is a valuable skill for DIY enthusiasts and those looking to save money on electronics projects. While it requires patience, proper tools, and strict safety precautions, the rewards can be significant.
Remember these key points:
-
Safety always comes first – wear protective gear and work in a proper environment
-
Use the right tools for the job – insulated pliers and cutters are essential
-
Work methodically – rushing increases risk
-
Test thoroughly – not all salvaged cells are worth keeping
-
Store properly – even good cells need proper storage conditions
Whether you’re building a power bank, flashlight, or e-bike battery, knowing how to safely extract and test these powerful little cells opens up a world of DIY possibilities.
Have you disassembled battery packs before? What projects have you built with salvaged cells? I’d love to hear about your experiences in the comments below!


